

Smart Screener brings AI extraction into Criteria-Based Screening:
- After configuring your Screening Criteria, generate Smart Screener.
- The AI will answer Yes/No answers for each criterion without prior training.
- View answers alongside annotations on the main Screening page
- Use these answers to guide your screening decisions.
Note: Smart Screener works independently to our inclusion probabilities in our screening model. Smart Screener is based on the answers to your criteria/questions, and the screening model is trained on your applied screening decisions.
Steps for Using Smart Screener #
The walkthrough below describes Smart Screener in Single Screening, where its answers feed straight into your screening decisions. If your nest is configured for Dual Screening, the tool behaves slightly differently — see Smart Screener in Dual Screening below.
Generate Smart Screener #
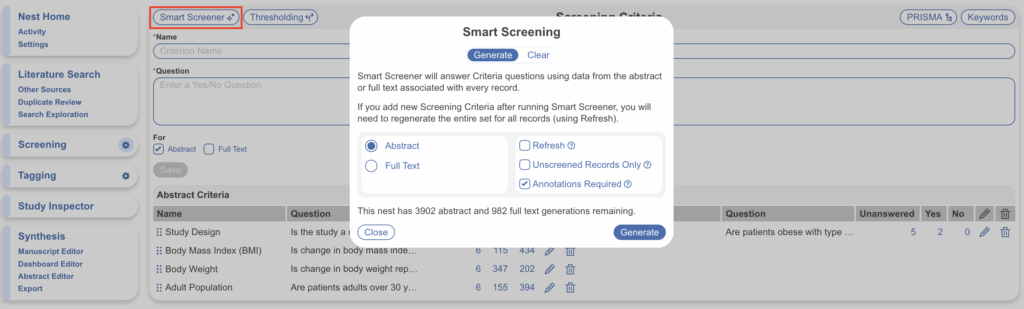
On the Configure Screening page, after you have created criteria, select “Smart Screener” in the top left. Here, you have a few settings to configure before generating:
- Abstract & Full Text: Select whether you want the AI to answer the questions for study Abstracts or Full Texts — to do both, you’ll have to run two separate generations. Ensure you have criteria created in the corresponding section before generating.
- Refresh: Check Refresh if you change the Screening Criteria and wish to re-generate smart screener for all records.
- Unscreened Records Only: Check to have Smart Screener run only on studies with no screening decision applied/that are unscreened.
- Annotations Required: Checked by default to only answer questions when an annotation is attached. You may wish to uncheck if annotations are less important for your review.
Note: the study limit for generating Smart Screener for Abstracts is 5000 studies and for Full Texts is 1000 studies. Then hit “Generate”.
Manual Screening with Smart Screener Assistance #
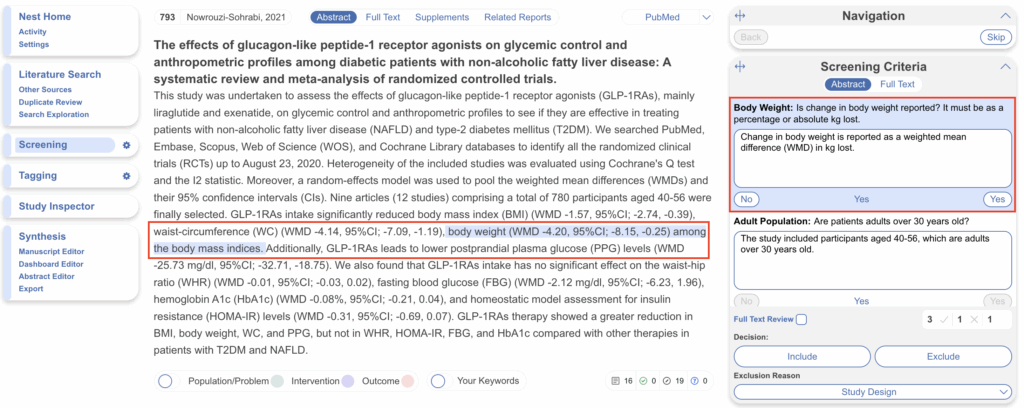
Once Smart Screener has finished, navigate back to the Screening page. You’ll see each question in the form has been answered (but still editable, of course). Typically an annotation is provided if the question was answered yes, with no annotation is the answer is no. This form of answered questions allowing a reviewer to scroll through, view the total count at the end and assign a screening decision to advance/include or exclude.
Bulk Decisions with Thresholding #
If you’d prefer to avoid manual screening and apply the AI suggestions without review, you can do so via Thresholding.
- After generating Smart Screener, navigate back to Configure Screening and select “Thresholding” in the top left (red below)
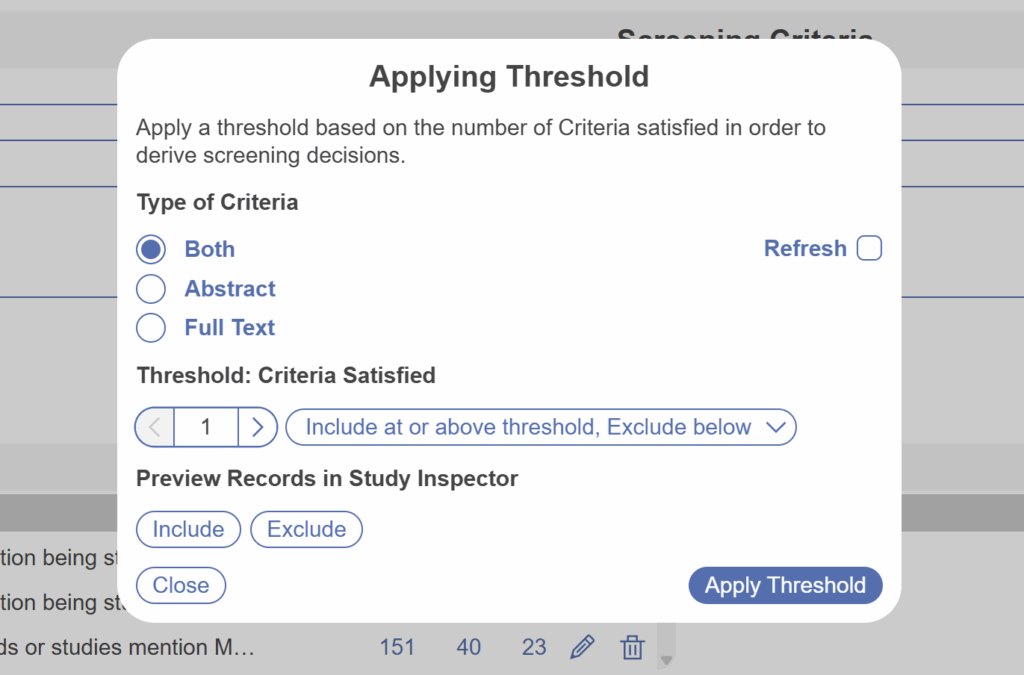
- Select the type of criteria you’d like to apply this threshold to, Abstract, Full Text or Both
- Select a threshold number: the number refers to the number of questions answered “Yes”
- Select the action to apply threshold of the options provided
For example, if you select Type of Criteria: Abstract, Threshold: 2, Include at or above threshold, Exclude below, then all study abstracts that have been assessed by Smart Screener that have answered “Yes” to 2 or more questions in the criteria will be included. All other study abstracts will be excluded. This is customisable as the criteria differ in number and importance from review to review.
- You may also wish to preview the set of records that this action will apply to, studies that will be Included and those that will be Excluded.
- Once you are happy with your threshold set, select “Apply Threshold”.
As with manual screening, applying this threshold will result in advanced/included records moving to the next stage of screening or data extraction (depending on your Screening mode).
Smart Screener in Dual Screening #
Smart Screener reads each record against the screening questions you’ve configured and answers them, and it does this the same way whether your nest is in Standard or Dual Screening. In Dual Screening, Smart Screener replaces the second reviewer in the workflow. This means one human reviewer, one Smart Screener then one human adjudicator.
Smart Screener makes that decision from the criteria answers alone, using a fixed rule:
- On abstracts, a record advances if every criterion is answered Yes. If you aren’t running two-pass screening, advancing is the same as including.
- On full texts, a record is included only if every criterion is answered Yes.
Once you run the Smart Screener on all records, only when each record has one human reviewer decision does the record move into Adjudicate Screening. If you’d like to view the Smart Screener decisions, use the reviewer-level screening filters (AB and FT) in Study Inspector and tweak the displayed column headers.
Thresholding. In a Dual nest, the Thresholding tool applies only to final (adjudicated) decisions, not to reviewer-level decisions — so you can’t use it to set Smart Screener’s reviewer-level calls here.
Auto-adjudication. Auto-adjudication is not yet available for criteria-based (Smart Screener) dual screening; it’s expected later this quarter.
Generations. Smart Screener in Dual mode draws from the same per-nest allotment as in single mode (5000 abstract and 1000 full text decisions).