In Screening, you select which studies to include in your nest and which should be excluded (with reasons).
Steps to Screen a Nest: #
1. Select Screening Mode #
There are several Screening Modes that you can select to alter the flow of records through your nest. Each option can be toggled on the Admin page for your nest:

Screening Modes:
- Standard Screening: Each record must be Included or Excluded by a single user, with the option of marking Full Text Review.
- Dual Screening: Each record must be Included or Excluded by two independent users, and then an Admin must adjudicate all disagreements. Each user and Admin has the option of marking Full Text Review.
- Robot Screening: Robot Screener is a type of Dual Screening where one of the traditionally human reviewers is replaced by an automated substitute. This only works when enough records are screened to train the Screening Model with enough accuracy, so each record must be Included or Excluded by one reviewer, and then one ‘robot.’ Then, the Admin (human) must adjudicate all disagreements. Each user and Admin has the option of marking Full Text Review.
- Two-Pass Screening:Each record must be Advanced or Excluded at the Abstract level by one user, and Included or Excluded based on a second Full Text Review step.
- Dual Two-Pass Screening:Each record must be Advanced or Excluded at the Abstract level by two users, and Included or Excluded based on two users’ designations during a second Full Text Review step. All disagreements at each step must be adjudicated by an Admin.
The best practice is to choose a Screening Mode before you begin Screening. While you can switch between Screening Modes at any point, and final Inclusion/Exclusion decisions can be carried over, switching modes after beginning Screening can result in lost data.
2. Configure Screening #
Before screening individual studies, you must Configure Screening. You have a choice of:
- Configuring Exclusion Reasons (default): list all reasons that a record would be excluded from your nest.
- Criteria-Based Screening (CBS): create yes/no questions for reviewers to answer, where yes = inclusion, no = exclusion, before selecting whether to include or exclude the study. This is a more comprehensive means of screening.
- Criteria-Based Screening can also be paired with Smart Screener, which will use AI to assess your questions against the study abstract and answer them for you. At this stage, you can either go through each study, review the AI-extracted answers and make individual screening decisions OR assign a threshold for the number of correct answers and automatically screen. See the link above for more.
- Note: CBS is not currently available for Dual modes, only Single modes in Standard or Two Pass. Additionally, this means it cannot be paired with Robot Screener at this time.

3. Configure Your Keywords #
To aid users in screening, you can configure keywords either in the Configure Screening page or on the Abstract view of any study in your nest. These User Keywords will be underlined in all abstracts.
These are different from the P, I, and O highlighting in that the highlighting is automatically generated by our RoboPICO software based on the abstract’s contents, while Your Keywords are custom-added as described here.
4. Select Screening Queue Order #
By default, studies shown in the screening queue will be ordered by Ref ID. If you wish, you can change this to randomized or by likelihood of inclusion (if a screening model was trained).
5. Include and Exclude Records #
The core activity of Screening is Including and Excluding records. In this process, you review the abstracts of records and exclude any that meet your Exclusion Reasons. For any article that is includable (as in, no Exclusion Reason applies), select “Include” and (optionally) upload the full text. There is also an option to “unscreen” a study. You can do this on individual studies or across many studies in a bulk action.
Uploading Full Texts #
Generally, you should complete Full Text PDF Upload for any record that you Include, so that it is available to Tag during the next stage. The exception: if you set up the Two-Pass Screening Mode (see above), you should upload full texts for all studies that are Advanced to Full Text Review.
There are several options for Full Text Upload:
- Study Inspector: Bulk Upload Full Texts via unpaywall (this auto-matches all open source articles to existing records)
- Study Inspector: Bulk Upload ClinicalTrials.gov reports
- Study Inspector: Bulk Upload Full Texts via your device (upload up to 50 pdfs to auto-match)
See instructions for bulk upload here.
- Upload Full Texts individually via link out or Article Galaxy
See instructions for individual FT upload here.
5a. Related reports #
While screening, it isn’t unusual to find the same data reported across multiple papers, and you will most likely include both the primary papers and all the secondary analyses. For the non-primary papers with data from the same trial, you can mark them as related reports to keep track of them and to have the PRISMA adjusted to reflect the difference in the number of studies versus the number of reports.
6. When are you finished Screening? #
You are finished Screening when all records in your nest are either Included or Excluded, as indicated by the Screening progress bar accessible within the module in the top right. At this point, you should move on to Tagging and Meta-Analytical Extraction (optional) for the included records!
Additional Tools #
- Screening Model: How to use the built-in AI-assisted Screening Model to assist in ordering records and informing your screening.
- Add Exclusion Reasons On the Fly: How to add Exclusion Reasons while you are screening without leaving the page.
- Exclusion Reason Sets: How to import Organizational Templates containing pre-configured Sets of Exclusion Reasons.
FAQs #
I have accidentally started screening in Single mode but my nest should be configured for Dual mode. How can I fix this? Can I carry my decisions over? #
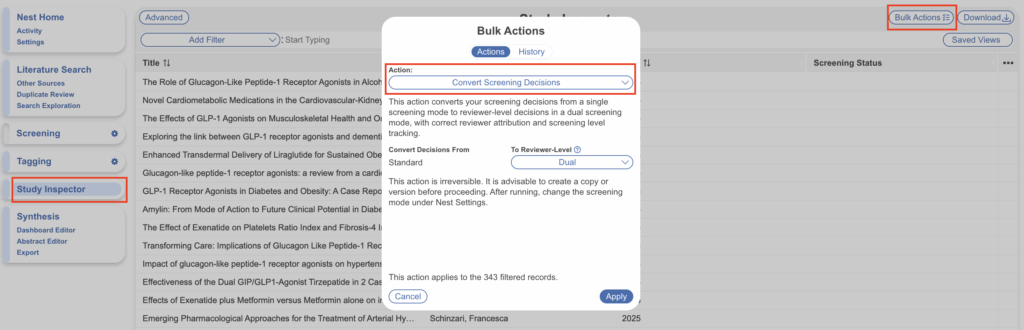
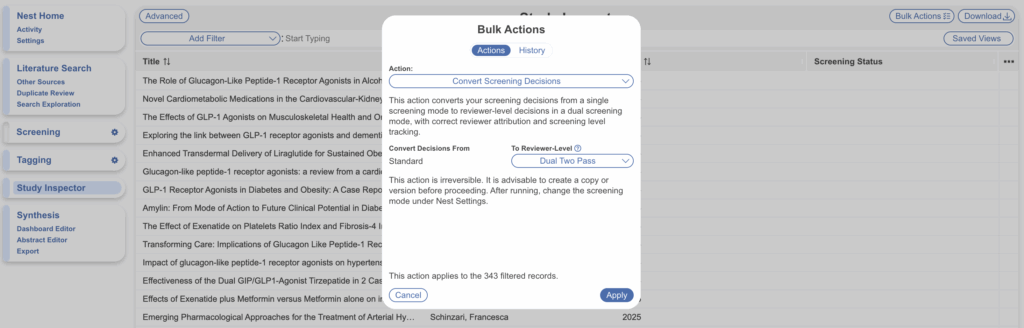
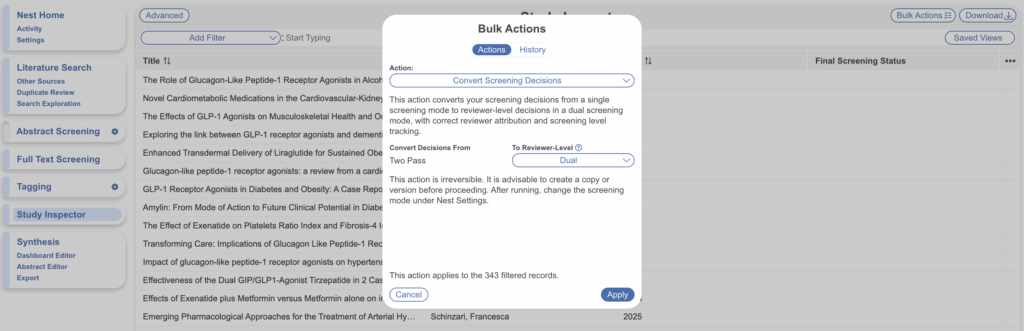
Yes. Before switching from single to dual modes (for either standard or two-pass) you must apply a Bulk Action to convert screening decisions from final to reviewer-level. Your nest must be:
- Configured for Exclusion-based Screening (default) and not Criteria-based Screening
- Configured in a Single Screening mode and not a Dual Screening mode
The bulk action will not work if your nest is in Criteria-based Screening mode or a Dual Screening mode.
Note: the following step is irreversible! We recommend making a nest copy via nest settings (bottom) just in case.
Steps #
First navigate to Study Inspector (no need to add a filter if you’re converting all study decisions), select Bulk Actions –> Convert Screening Decisions. Depending on your existing screening mode, follow one of the following steps:
- If converting from Single, Standard mode –> Dual mode
- All existing final screening decisions will be converted to reviewer-level decisions under the applicable users. There will be no final decisions.
- After selecting “Apply”, head to Nest Settings and switch the Screening mode to “Dual”. Now, you can expect each screened record to have only one reviewer-level decision, meaning another reviewer-level decision and an adjudicated decision is required for applicable studies.
- If converting from Single, Standard mode –> Dual Two Pass mode
- All existing final screening decisions will be converted to reviewer-level decisions at the Abstract Screening stage. If “Full Text Review” was checked during initial screening, these decisions will be carried over to reviewer-level decisions at the Full Text Screening stage too. There will be no final decisions.
- After selecting “Apply”, head to Nest Settings and switch the Screening mode to “Dual” & “Two-Pass”. Now, you can expect each screened record to have only one reviewer-level decision at the Abstract Screening stage, and those will full text review will have one reviewer-level decision at the Full Text Screening stage. This means another reviewer-level decision and an adjudicated decision is required for all applicable studies at both stages.
- If converting from Single, Two Pass –> Dual
- All existing final screening decisions at the Full Text stage will be converted to reviewer-level decisions under the applicable users. Abstract Screening decisions are disregarded. There will be no final decisions.
- After selecting “Apply”, head to Nest Settings and switch the Screening mode to “Dual”. Now, you can expect each full text screened record will have only one reviewer-level decision, meaning another reviewer-level decision and an adjudicated decision is required for applicable studies.
- If converting from Single, Two Pass –> Dual Two Pass
- All existing final screening decisions will be converted to reviewer-level decisions at the Abstract Screening stage and the Full Text Screening stage. There will be no final decisions.
- After selecting “Apply”, head to Nest Settings and switch the Screening mode to “Dual” & “Two-Pass”. Now, you can expect each Abstract Screened record to have only one reviewer-level decision at the Abstract Screening stage, and each Full Text Screened record to have only one reviewer-level decision at the Full Text Screening stage. This means another reviewer-level decision and an adjudicated decision is required for all applicable studies at both stages.