Configure Tags in Standard Mode #
Standard Tagging mode allows you to configure concepts to be extracted via a list of dropdown tags instead of as a form of questions. The tag hierarchy you configure will display the most general concepts at the top (root tags) with more specific concepts beneath (child tags) and this will be replicated in the dropdown list in the Tagging module.
Navigate to Settings and turn on Standard Mode #
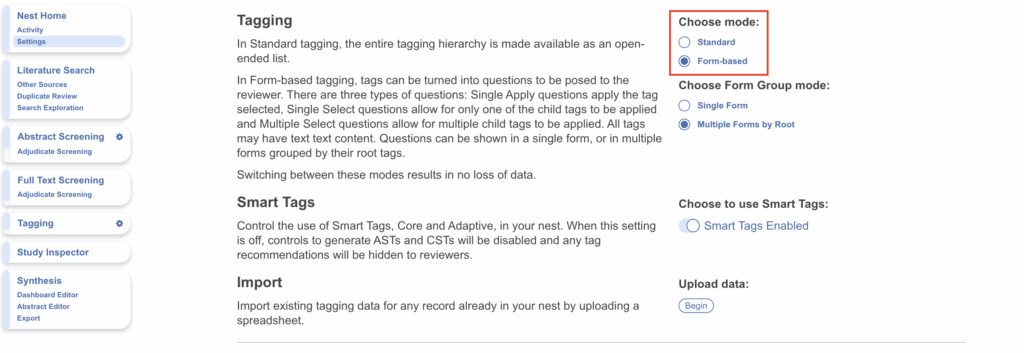
Note: switching between modes results in no loss of data. If you have already configured questions in Form-based mode, they will still be available to tag in Standard mode too.
Configuring Study Tags #
1. Navigate to Configure Study Tags #
Click on the gears icon in the Tagging tab:
This will bring you to the Tag Hierarchy, which will be blank until you have added tags.
2. Create Root Tags #
Root Tags are the highest level of the hierarchy, and have no parent tags. These should represent the most general categories of qualitative evidence you are gathering. For example, you could create Root Tags representing the patient population, intervention, comparison group, and outcomes (PICO) or similar, and add in any other concepts of interest (such as Study Design).
To create a new Root Tag, make sure you’re in edit mode (pencil icon), click the blue tag icon in the middle, and a new root tag will appear beneath the rest or you can drag and drop the same blue tag icon to place a tag in your desired position. Tag position can be altered any time by selecting, dragging and dropping the tag. The right hand side will display the tag’s details you should fill in.
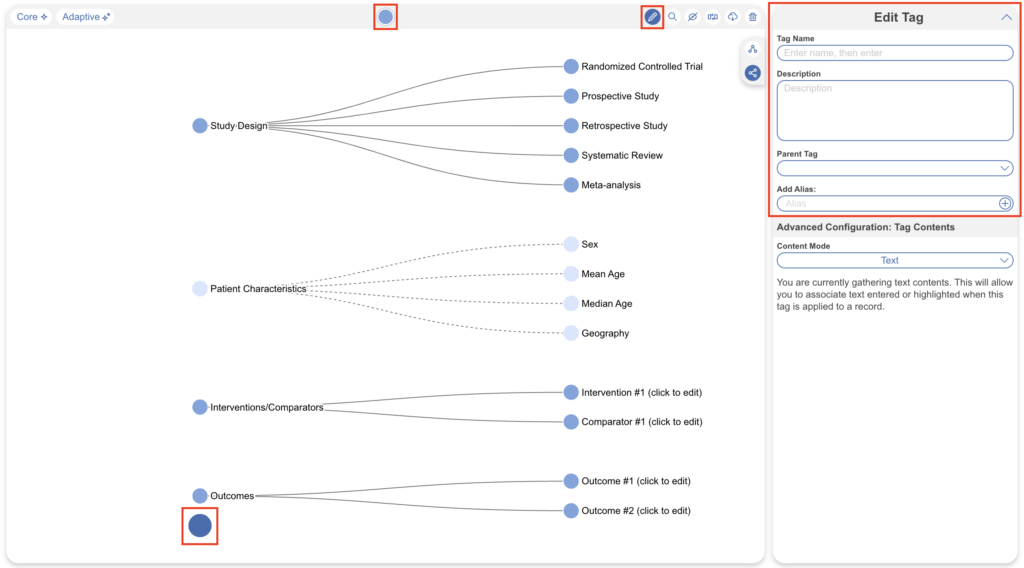
Alternatively, if the pencil icon is toggled, you have the option to quickly create a tag by inputting its name and hitting Enter on the keyboard, and coming back to edit details later on.
Then, name the tag and add a Description to give details to your team on what a tag represents and/or an alias (both optional).
You are now ready to build your hierarchy out from your Root Tags by creating “Child Tags”. Tags should get more specific as they proceed deeper into the hierarchy.
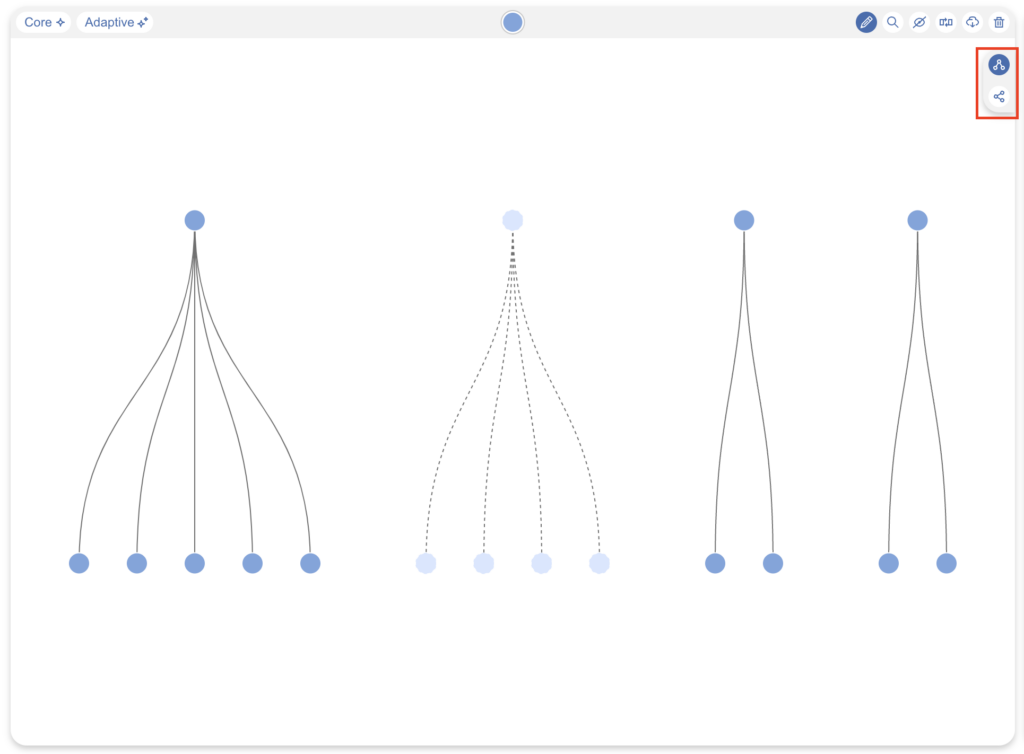
By default, the “left-to-right” configuration is presented (red) to best display tag names. If you prefer “top-to-bottom” configuration, select the hierarchy icon above.
3. Create Child Tags #
You can build your hierarchy outwards by adding child tags below the Root Tags. To create child tags, drag and drop the new tag icon under your desired parent tag. Input the more specific Tag Name, and add a description if applicable.
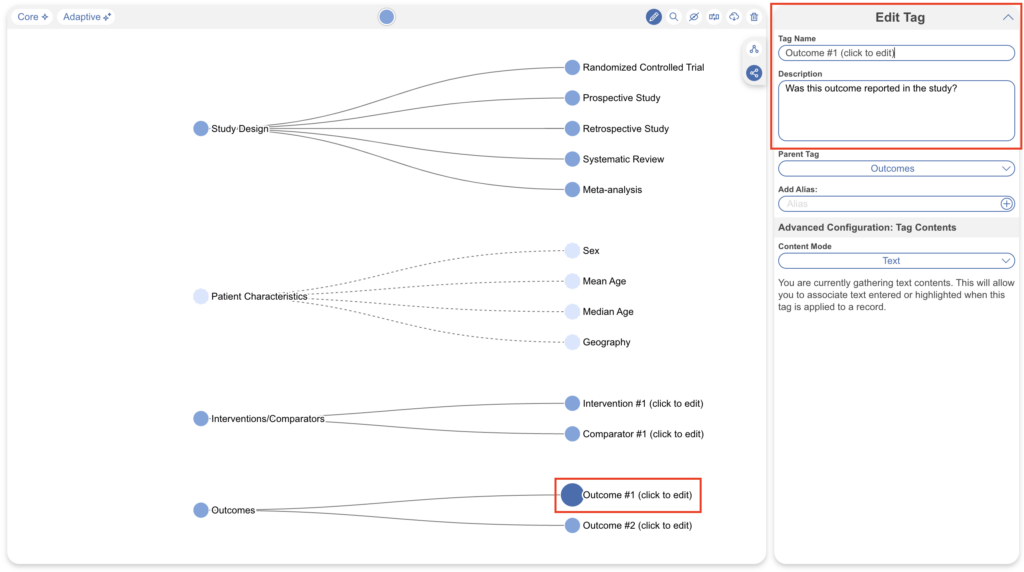
Once you have added a child tag, your hierarchy should contain the Root Tag and the tag you created below it. In the above example, Study Design is the root tag, and Randomized Controlled Trial is the child tag. Continue building out child tags until your hierarchy contains a tag for every concept you want to recognize from underlying studies and structure into your Qualitative Synthesis.
Editing the Tag Hierarchy #
Making edits to your tag hierarchy is the same for both Standard and Form-based Tagging modes, see here for more on the full functionality of the tag hierarchy.
Recommendations in Hierarchy Building #
If you need some assistance in starting your hierarchy, feel free to import one of our public templates.
If you are looking for Best Practices recommendations on what to include in your hierarchy, see here!
Applying Tags in Standard Mode #
Tags reflect the qualitative content of underlying studies and provide method for attaching text or images from these studies. After tags have been configured, and so long as at least one study has been included, you can begin applying tags. Once a tag is applied, it is immediately viewable on Qualitative Synthesis.
Steps for Standard Tagging: #
1. Navigate to Tagging #
Click the “Tagging” button on the left-hand side, in the Nest Menu.
This will enable you to apply tags to records sequentially. If you would prefer to search and find records to tag, or to view records that have already been tagged, use Study Inspector.
2. View the Full Text #
Click on the “Full Text” toggle in the upper left to view the full-text PDF.
If no full text has yet been imported, learn how to upload it here.
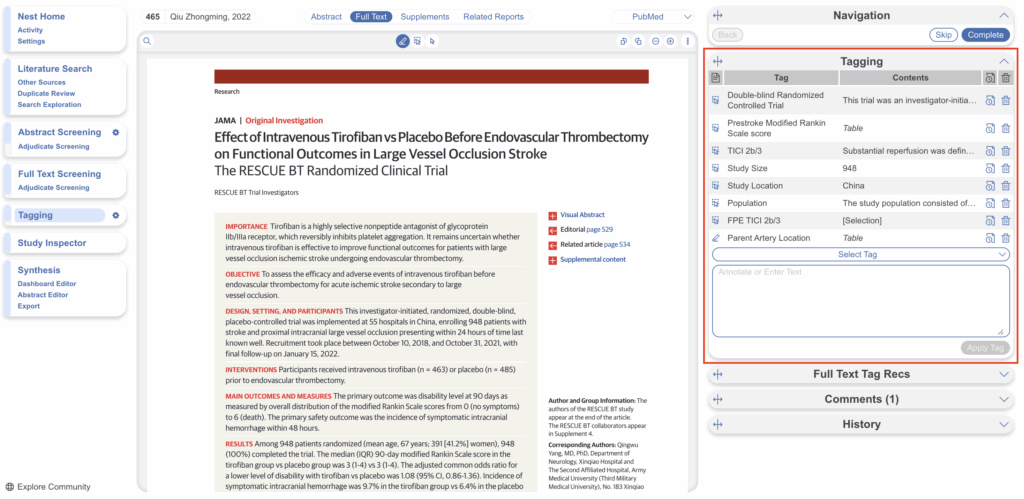
3. Find the Relevant Tag in the Drop-down #
As you read through the article and find the relevant tags in the text, tables, or figures, search/select the relevant tag in the drop-down:
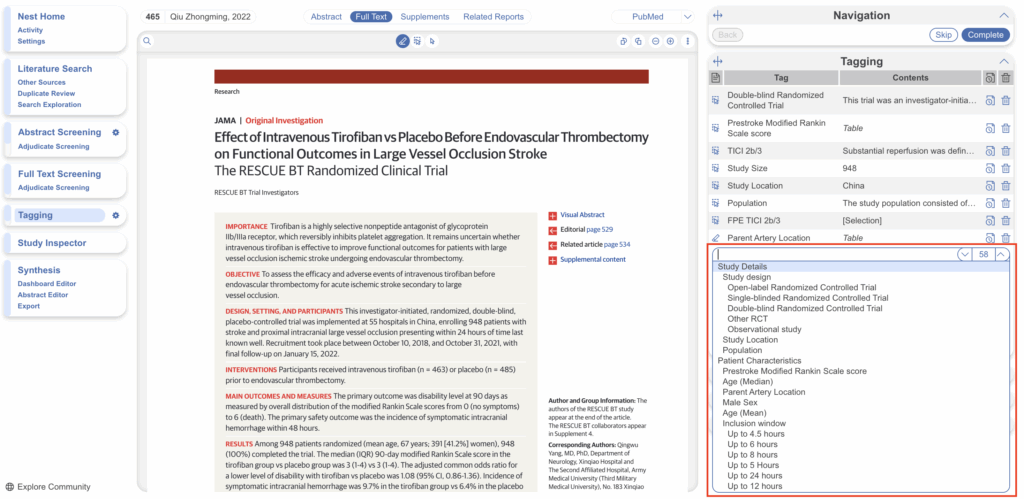
Tags are ordered in the dropdown based on the hierarchy with the leftmost root node at the top, followed by its children, followed by the next root node.
3a. Tag Details #
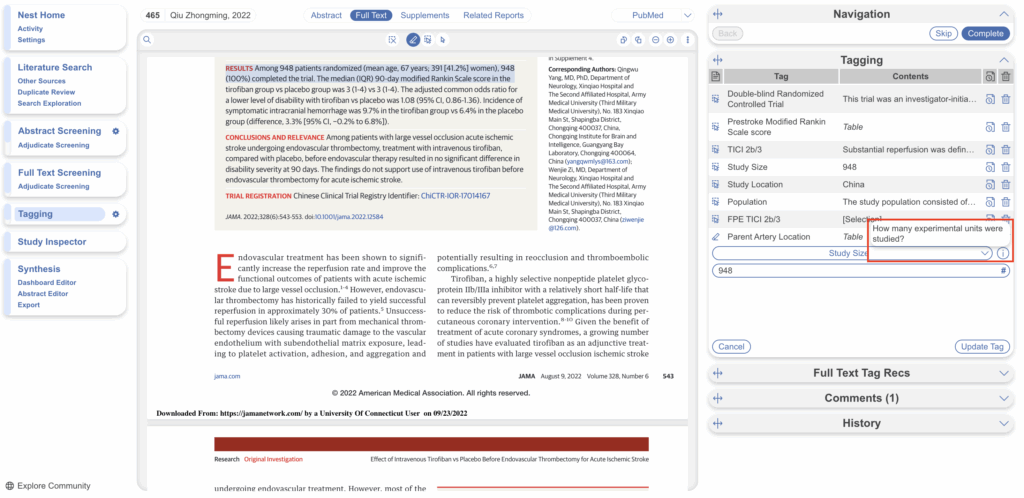
If you need further details on the tags in order to determine applicability, and if the Tag Description was filled in for the tag in question, you can view it next to the Tag drop-down. An “i” icon will appear next to the Tag if a Description exists, and you can view it upon hovering:
3b. Tag Recommendations #
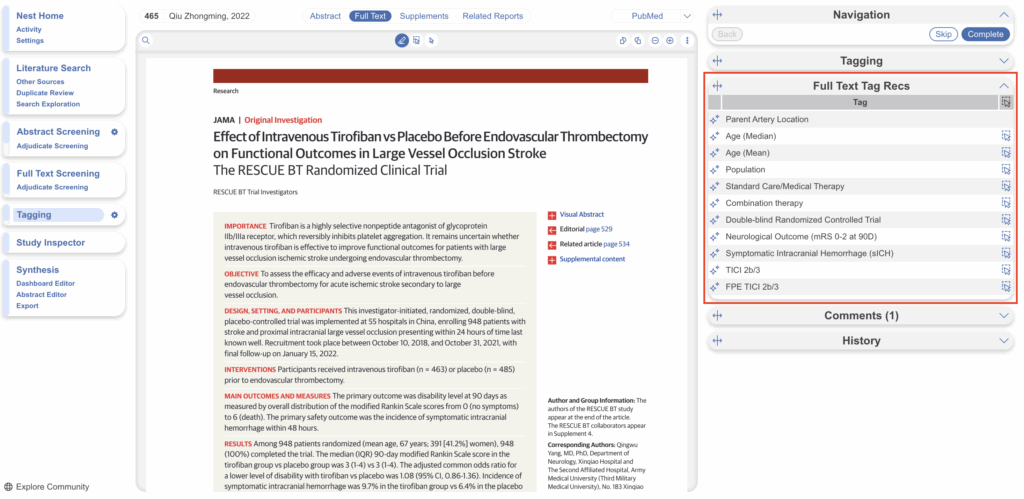
If generated on the Configure Tag Hierarchy page, AI Tag Recommendations are displayed in the right-hand menu tab. “Abstract Tag Recs” on the Abstract view and “Full Text Tag Recs” on the Full Text view. Tag recommendations highlighting specific text that may be applicable to the tags in your hierarchy and are displayed in a list format in Standard Tagging mode (as opposed to inline with tag questions in Form-based Tagging mode). Learn more about how to use Tag Recommendations.
Here you’ll see a list of all the recommendations found for the study according to your hierarchy:
4. Add an Annotation #
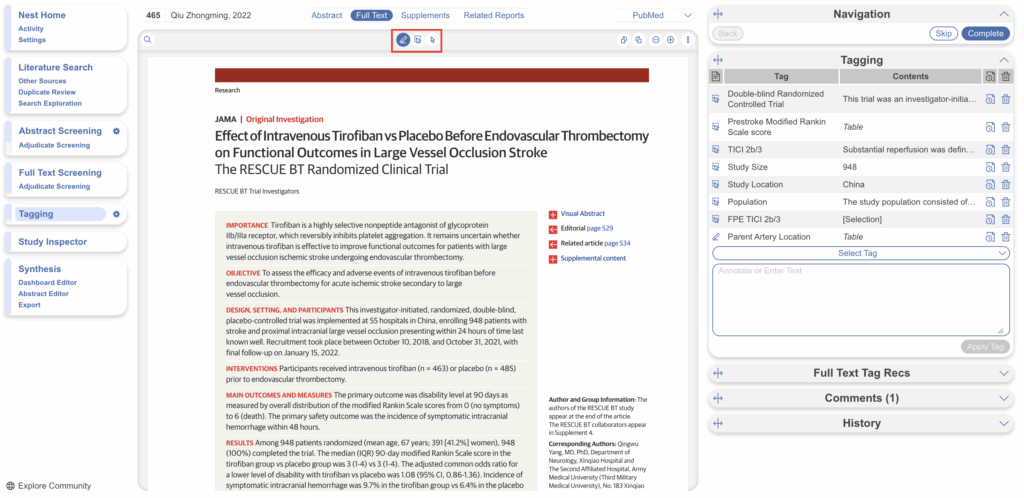
To associate text content with a tag, identify this text either before or after selecting the tag from the drop-down. You have three options for how to identify the text excerpt that will be associated with that tag:
- Highlighting (Text Annotation): A traceable, exact quote from the text of the article.
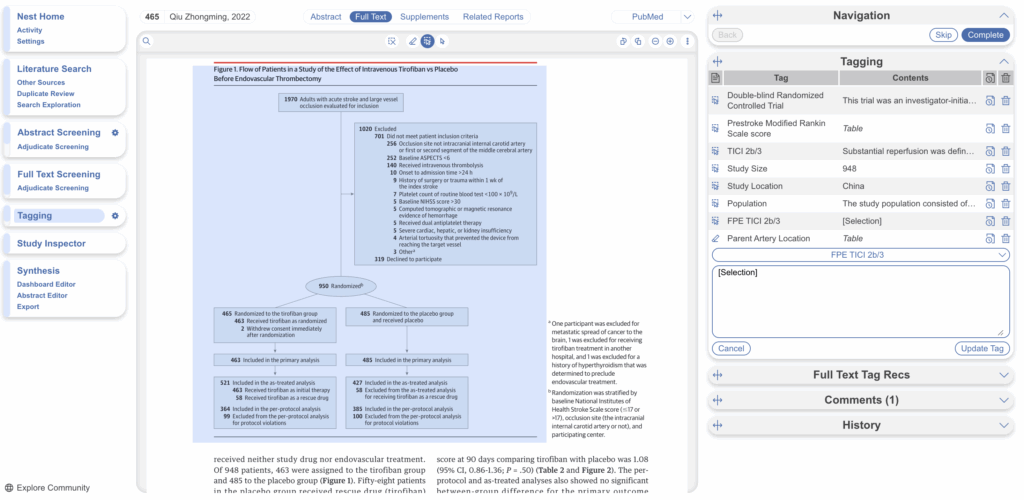
- Selection (Area Annotation): A traceable, exact image extraction from a table, figure, or other area of the article.
- Manual entry (No Annotation): A non-traceable excerpt (that is, an excerpt that is not connected to a specific part of the article) that you type into the Tag Text box.
You can annotate either before or after selecting the tag of interest in the drop-down.
4a. Use the Highlighting Tool: #
The default Tag Text method is Highlighting. You can also manually select the Highlighting icon (left-most icon above), if you need to toggle back to this option.
Click and drag over the text you would like to Highlight. Highlighting will extract an exact text excerpt that is shown in light blue, and the text will be automatically populated to the Tag Text box.
4b. Use the Select Tool: #
To switch from the default Highlighting tool to the Select tool (middle icon above)
Create a box across the area you’d like to select for the tag. Click in the left-hand corner of your area of interest and drag across the text or table. This selection will be automatically saved in the tag text box.
Selection / Area Annotation is best used on tables, figures, and images that are not amenable to exact text quotation.
4c. Manually type out in Tag text box: #
If you prefer to manually type the information from the text, you can do this by clicking your cursor in the tag text box and type what you’d like.
Manual text entry should be used whenever you want to associate customized text rather than quotation from the underlying article. Warning: manual entry will not maintain an exact location in the full text, so it may be difficult to find the exact contents of the article that support manually entered text excerpts.
To select text manually (without highlight) select the right-most cursor icon.
Clear Annotations #
If you need to redo your tag text annotation, you can either simply redo the action (Highlighting, Selecting, or Manually typing), or select “Clear Annotation” from the top of the Full Text (left-most x icon).
This will remove all tag text; next, choose the tag text type you would like to use, and redo the relevant Highlight, Selection, or Manual text entry.
Q: Why not leave the annotation / tag text blank?
A: It is possible to apply tags without filling in the tag text. However, doing so will mean that the only evidence that the tag is applicable to that specific study will be the fact that it was applied, and those who view your Qualitative Synthesis will have no context. If you fill in text content, you provide specific evidence of that tag’s applicability as well as presenting the specific information from that study to viewers of Qualitative Synthesis.
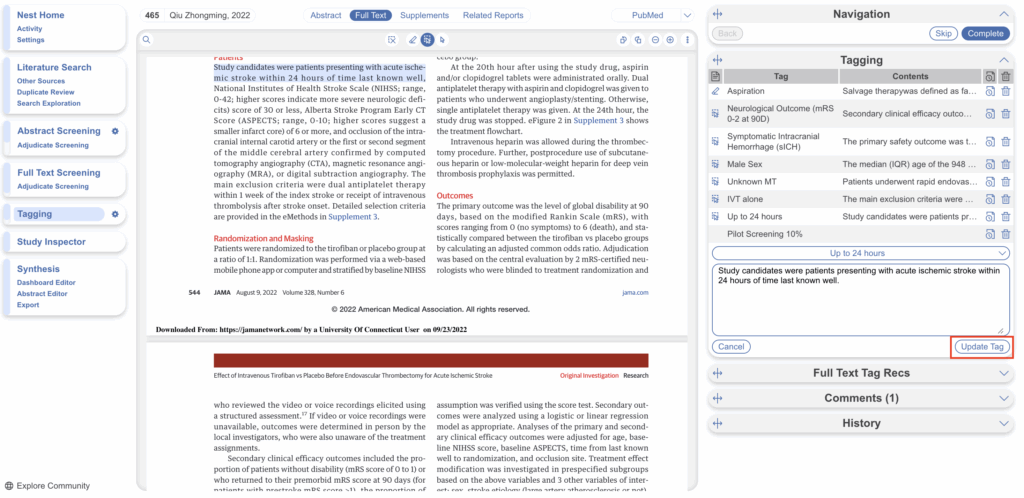
5. Click “Apply Tag” #
Once you have the content of interest into the tag text box, make sure that you have selected the relevant tag from the drop-down menu (red box). Once you have confirmed that both the Tag and the Tag Text Content are correct, click “Apply Tag” or “Update Tag”.
Add New Tags on the Fly #
When you find a term that you want to add to the Tag Hierarchy, you can either add it on the Configure Tagging page, or add it ‘on the fly’ without leaving the page.
To add a tag on the fly, type the title of your new tag into the “Select Tag” box, and click “Add Option” that appears at the top of the drop-down list of tags.
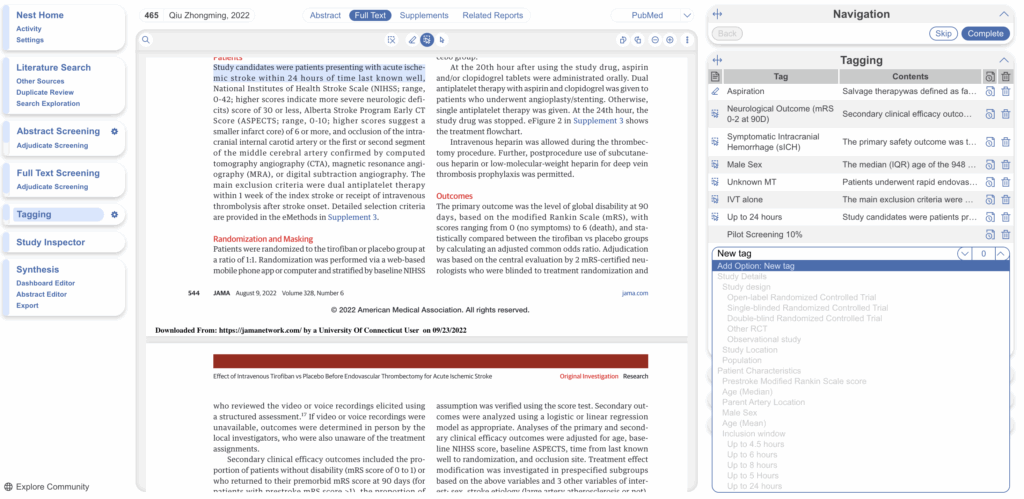
In the modal that appears, confirm the tag name, add a description (optional), and as relevant, identify the new tag’s Parent Tag. Once created, you will now be able to find the new Tag on the drop-down list.
Note: Only tags with text contents can be created on the fly. To toggle on table contents, edit the tag in Configure Tagging.
Tagging Supplemental Materials #
If the study you are tagging has supplemental materials in pdf format, you may also apply tags to these texts. The functionality is the same as tagging full texts: automatic copy of text to clipboard and text box, text highlighting and area selection allowing immediate direction to the excerpt when the tag is selected etc.
Note: Tag Recommendations are currently unavailable for supplemental pdfs.
Tags with Table Contents #
Similarly to tags with text contents, you select the dropdown to find the tag of choice. When selected, the table you created will be shown and you can input text into any of the rows. When you are satisfied, click “Apply Tag.”
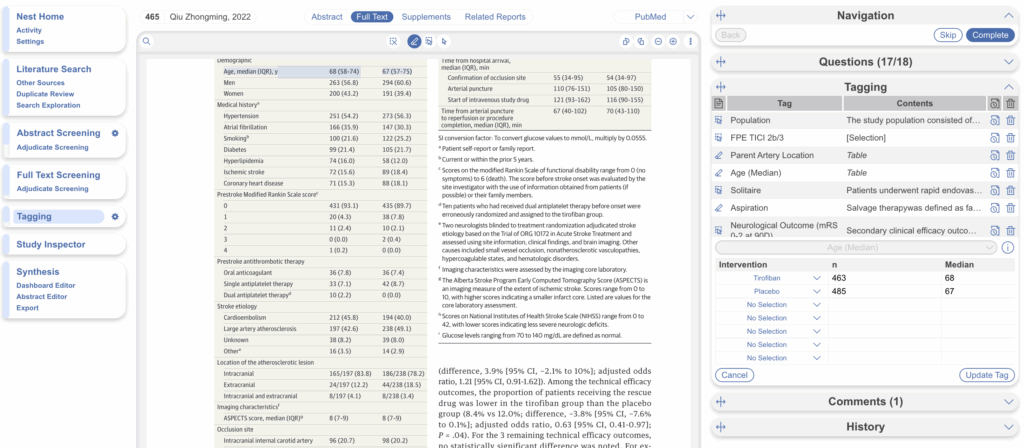
Highlighting pdfs does not automatically input the text into the box unlike tags with text contents only. However, it will remember any text highlighted or selected in the pdf and auto-scroll to it when the tag is selected again.
Note: If you are entering numerical data into tables, no automated statistics are generated. This is only done in the Meta-Analytical Extraction module.
To alter the columns in the table for this tag, either click on the column header in the Tagging module itself, or head back to Configure Tagging. Learn more about tag tables here.
Related Report Tags #
When you apply a tag to a record that has an associated related report (RR), the tag is also displayed on the related report but with a RR icon to differentiate the tag origin. Learn more about related report tags.
