You may have a legacy or existing project you wish to upload and continue in Nested Knowledge. To do this, first ensure you have imported your records via a Literature Search and uploaded screening decisions, which will be matched to these records (and will only do so if they already exist in your nest!). The next step is uploading tags. Take a look at our instructional video (at 5:46) or scroll for written guidance.
Import Tags #
To import Tags, you will need to bring an Excel sheet or CSV formatted exactly as outlined below; you can use our template to ensure the formatting is correct. Additionally, tags with text contents must be uploaded separately to tags with table contents.
Navigate to Settings #
Navigate to Nest Settings, scroll down to Tagging –> Import –> Upload data: Begin.

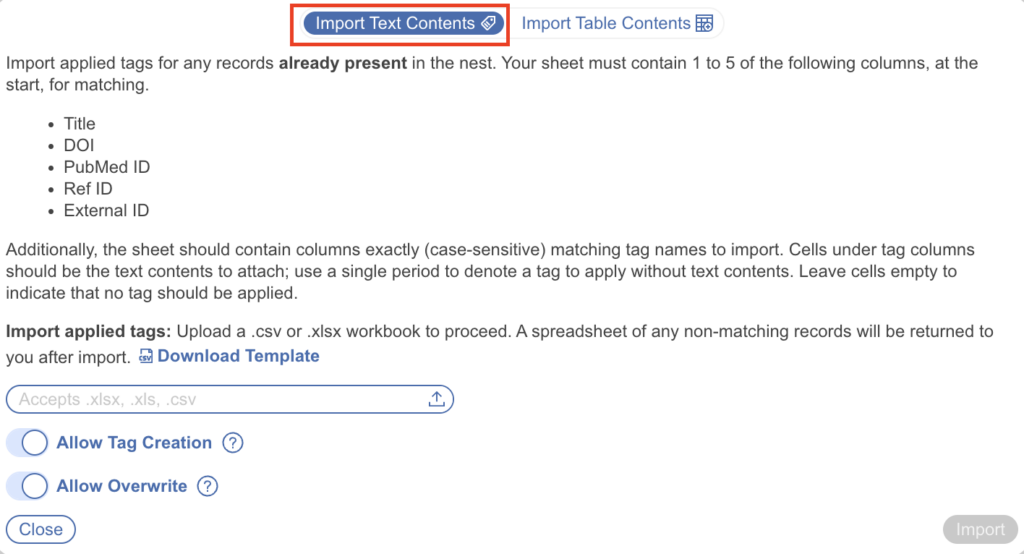
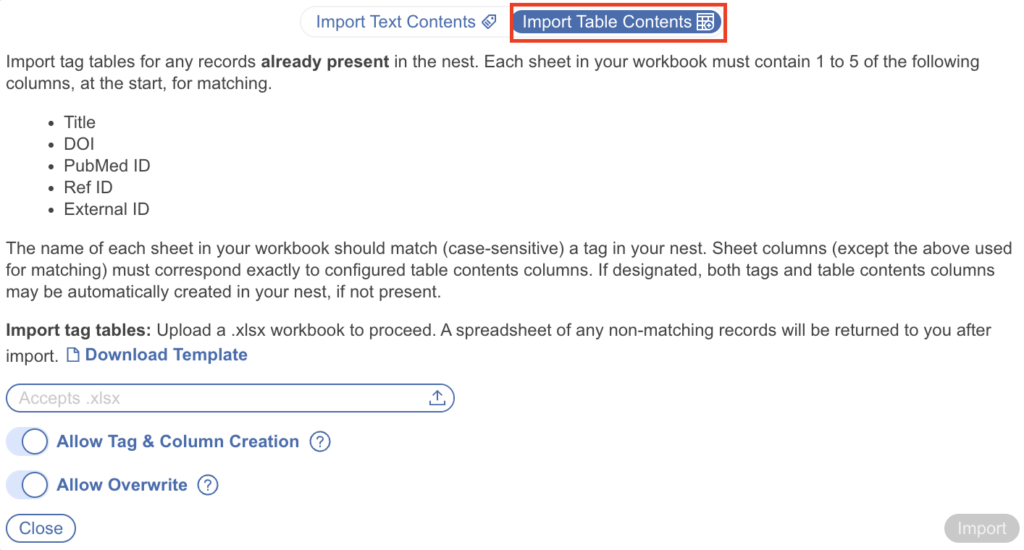
Once you have selected “Begin,” a modal will open showing the ability to download the template, upload an Excel or CSV, and adjust settings. In the modal, you have the ability to import tags with accompanying text contents and tags with table contents separately.
Tags with Text Contents #
By default, importing tags with text contents is selected and tags with table contents can always be imported here or configured later on in your hierarchy. Imports must follow the correct format, you can download the template from the Import Modal:

The titles of your sheet must have 1-5 of the following exact column names:
- DOI
- Title
- PubMed Id
- Ref Id (if applicable)
- External Id
Then, each Tag you’d like to apply must be in an individual column with the exact tag name; the cells under the Tag Name will indicate whether that Tag should be added to the record in question with the text in the cell as the Tag Excerpt.
You must provide, in those columns:
- At least one bibliographic item: DOI, Title, PubMed Id and, if applicable, Ref Id
- For all Tags to be applied to any record, the exact Tag name in the column header,
- For all records a Tag should be applied to, fill in your desired Text Content in the cell. If the cell is left blank, this indicates that the Tag in question should NOT be added to that record.
See below for a correctly-filled-out example sheet (if using Ref ID, this would be an additional column):

In this sheet, the first two records would have only one of the tags listed added to them; the last two records would have both tags added: “Study Type” and “Intervention.” The text added to each tag is found in the corresponding cell for each record.
Settings: Allow Tag Creation #
The first setting determines whether the nest should automatically create new Tags based on the imported sheet.
If there is a Tag listed in the sheet that is not already configured in the nest, leaving this setting toggled “on” will automatically create any missing Tags.
These Tags will be added to your nest without Parent Tags, so make sure you check Configure Tagging and assign the appropriate Parent Tags after Import.
If you would prefer that no new Tags be created in your nest, toggle this setting off.
If there are any Tags that do not exactly match Tags in the nest, the import of records with those non-matching Tags will fail import and a list of records that failed Tag import will be displayed to you.
Settings: Allow overwrite #
The second setting determines whether the tag excerpts in your import should override tag excerpts already present in the nest. That is, if you want any existing tag excerpts to be replaced by the imported excerpts, leave this setting toggled “on.”
If you would prefer that existing tags be left (and not overwritten), toggle this setting off. If toggled off, no overwriting will be completed over existing tags.
Be careful about this action, because no report will be returned regarding overwriting of records!
Import Tags with Text Contents #
Once you have ensured that your import sheet is the proper format, upload your sheet by drag-and-drop or by selecting the Upload button.
When complete, check your nest for the new Tags you uploaded and to ensure that they were altered as you had planned.
Tags with Table Contents #
For import of tags with accompanying tables, toggle “Import Table Contents.” This time, each sheet within your workbook should correspond (case-sensitive) to a tag in your nest you’d like to import a table for. Imports must follow the correct format, you can download the template from the Import Modal:

The titles of your sheet must have 1-5 of the following exact column names:
- DOI
- Title
- PubMed Id
- Ref Id (if applicable)
- External Id
Then, each remaining column must match exactly (case-sensitive) the columns configured in the pre-existing tag table. You can also have tags and columns created for your tag table by selecting “Allow Tag & Column Creation.”
Settings: Allow Tag Creation #
The first setting determines whether the nest should automatically create new Tags based on the imported sheet.
When this is toggled on, new tags and corresponding tables will be created if they do not exist or they cannot be matched to existing tags in the nest.
These Tag tables will be added to your nest without Parent Tags, so make sure you check the Configure Tagging page and assign the appropriate Parent Tags after Import.
If you would prefer that no new Tag Tables be created in your nest, toggle this setting off.
If there are tag tables/sheets in your workbook that do not exactly match existing tags in the nest, the import of records with those non-matching Tags will fail import and a list of records that failed Tag import will be displayed to you.
Settings: Allow overwrite #
The second setting determines whether the tag tables in your import should override tag tables already present in the nest. So if you want any existing tag tables to be replaced by the imported excerpts, leave this setting toggled “on.”
If you would prefer that existing tag tables be left (and not overwritten), toggle this setting off. If toggled off, no overwriting will be completed over existing tags.
Be careful about this action, because no report will be returned regarding overwriting of records!

