Core Smart Tags is an AI Extraction tool for commonly extracted elements in research projects: Population, Interventions/Comparators, & Outcomes (PICOs), Study Type, Study Location, and Study Size.
There are several advantages of Core Smart Tags:
- Immediate categorization of all studies when you add a Search, which can assist with iterative search strategy or screening
- Automatic Tag hierarchy generation and extraction
- Additional visuals for drilling down on interpreting your evidence
The tool currently extracts from Study Abstracts and is incorporated in several parts of the AutoLit workflow including Search Exploration for exploring these elements based on custom concepts, Tagging for auto-generated recommendations and extraction of these elements, and Dashboard for display of these data as cards.
View a brief overview of Core Smart Tags:
Search Exploration #
Search Exploration allows you to input concepts, explore the literature and generate a search query to finalize in your nest. To assist in the exploration and query building, after inputting your concepts, view the most commonly reported PICOs, view a Study Type sunburst diagram, a Study Location choropleth/map (see below screenshot), a Study Size histogram, and an Acronym dictionary.
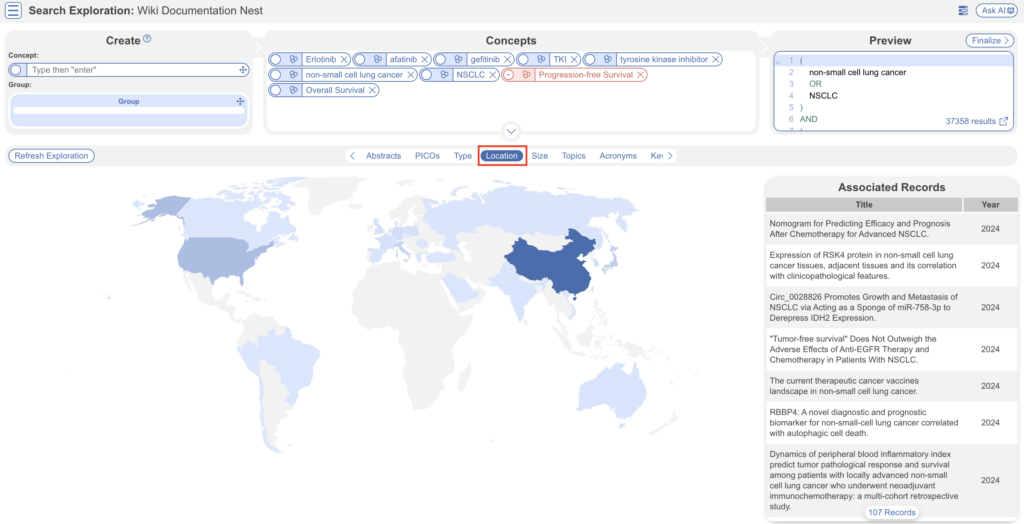
Interacting with each of these Exploration pages, you’ll be able to view associated records on the right hand side where you can do a deeper dive of specific records’ abstracts.
Note: While these cannot be directly incorporated into the search query, once the search is finalized, filters can be applied in Study Inspector to view and apply bulk actions to subsets of studies!
Tagging/Data Extraction #
Once a search has been finalized and records have been imported into your nest, Core Smart Tags switch from being your Search strategy tool to providing structure and time savings to your data extraction.
1. Ensure Smart Tags is turned on #
You can control the use of Smart Tags, Core and Adaptive, in your nest. Note: Core Smart Tags is for pre-set questions (PICOs, Study Location, Type and Size) in your review, Adaptive Smart Tags is for custom questions.
The ability to use Smart Tags is turned on in Nest Settings by default but when this setting is off, the controls to generate ASTs and CSTs will be disabled and any tag recommendations will be hidden to reviewers.

2. Input Research Question and Select Concepts #
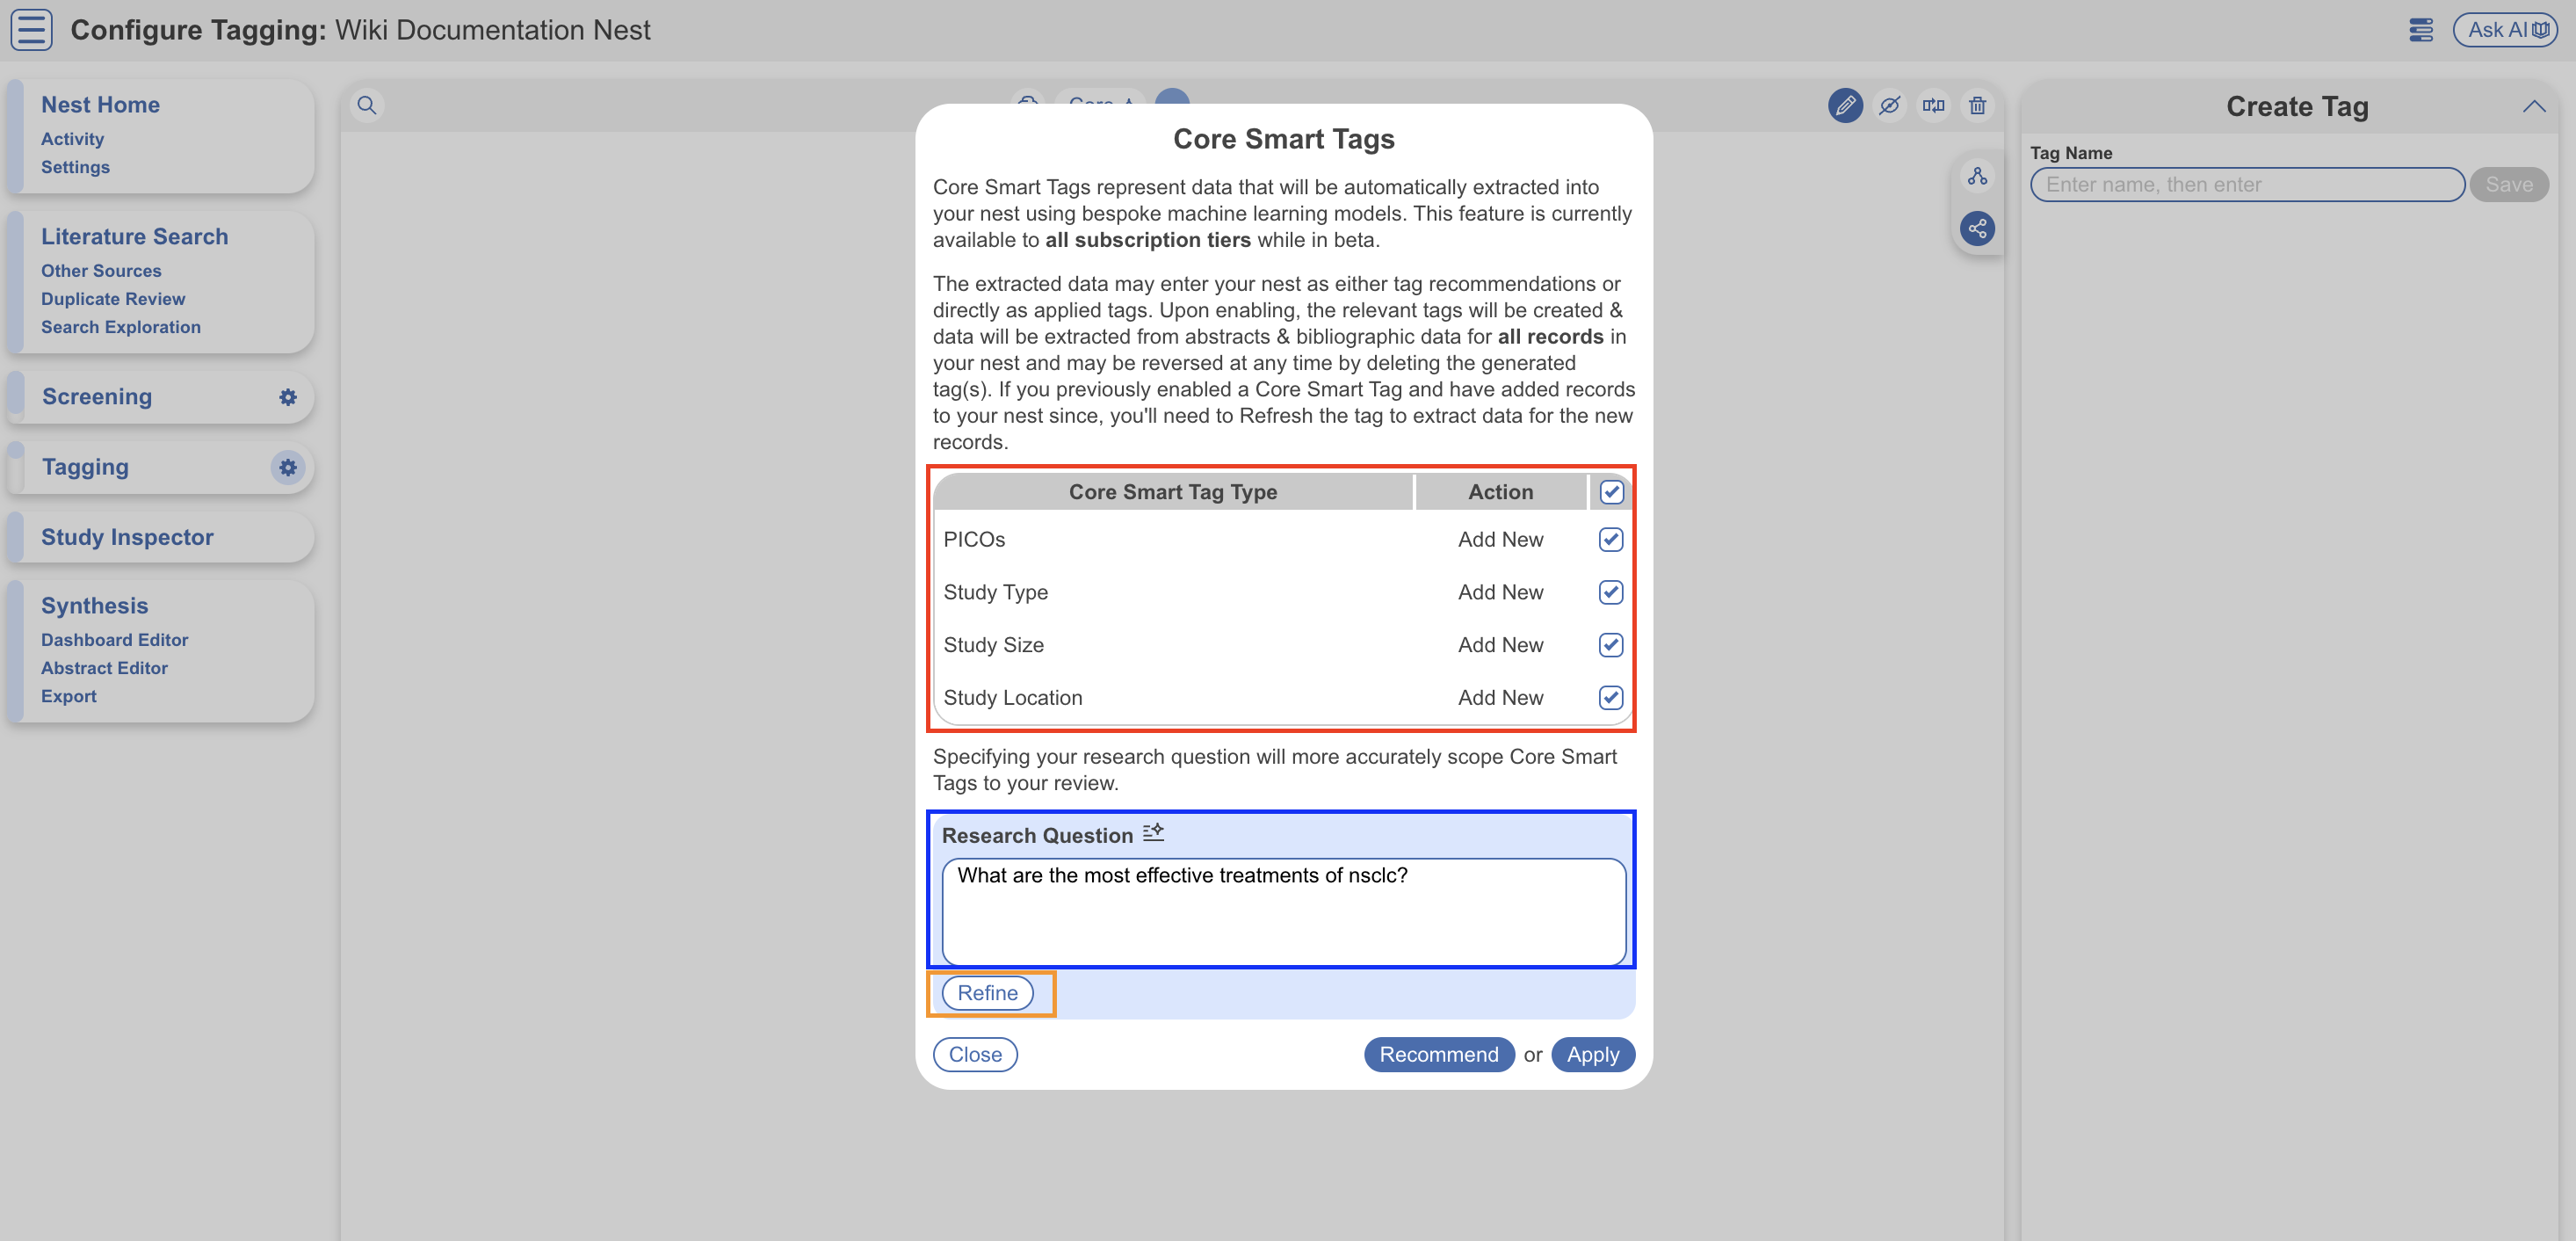
Now, navigate back to the Tag Hierarchy. You can input a research question to help guide the AI as well as select from what concepts you’d like to be extracted from these studies. First navigate to the Configure Tag Hierarchy page, and select the “Core” button (red).

In the modal, choose from the options of PICOs, Study Type, Location and Size to be extracted in your studies (red; these are all selected by default but may be unchecked/checked depending on your preference). If you decide not to select one now, don’t worry, you can still come back to add them later or refresh existing ones.
Then input your research question (blue). If you previously used Smart Search and inputted a research question at that stage, it will be retained and placed here too.
Refine your Research Question #
To refine your research question, select “Refine” (orange above). This opens up an AI Chat Bot, which will ask you a few questions to refine your question (red; left-hand side) and make a recommendation of how your research question could be refined (blue; right-hand side). Answer the questions posed by the AI using the text box (pink).
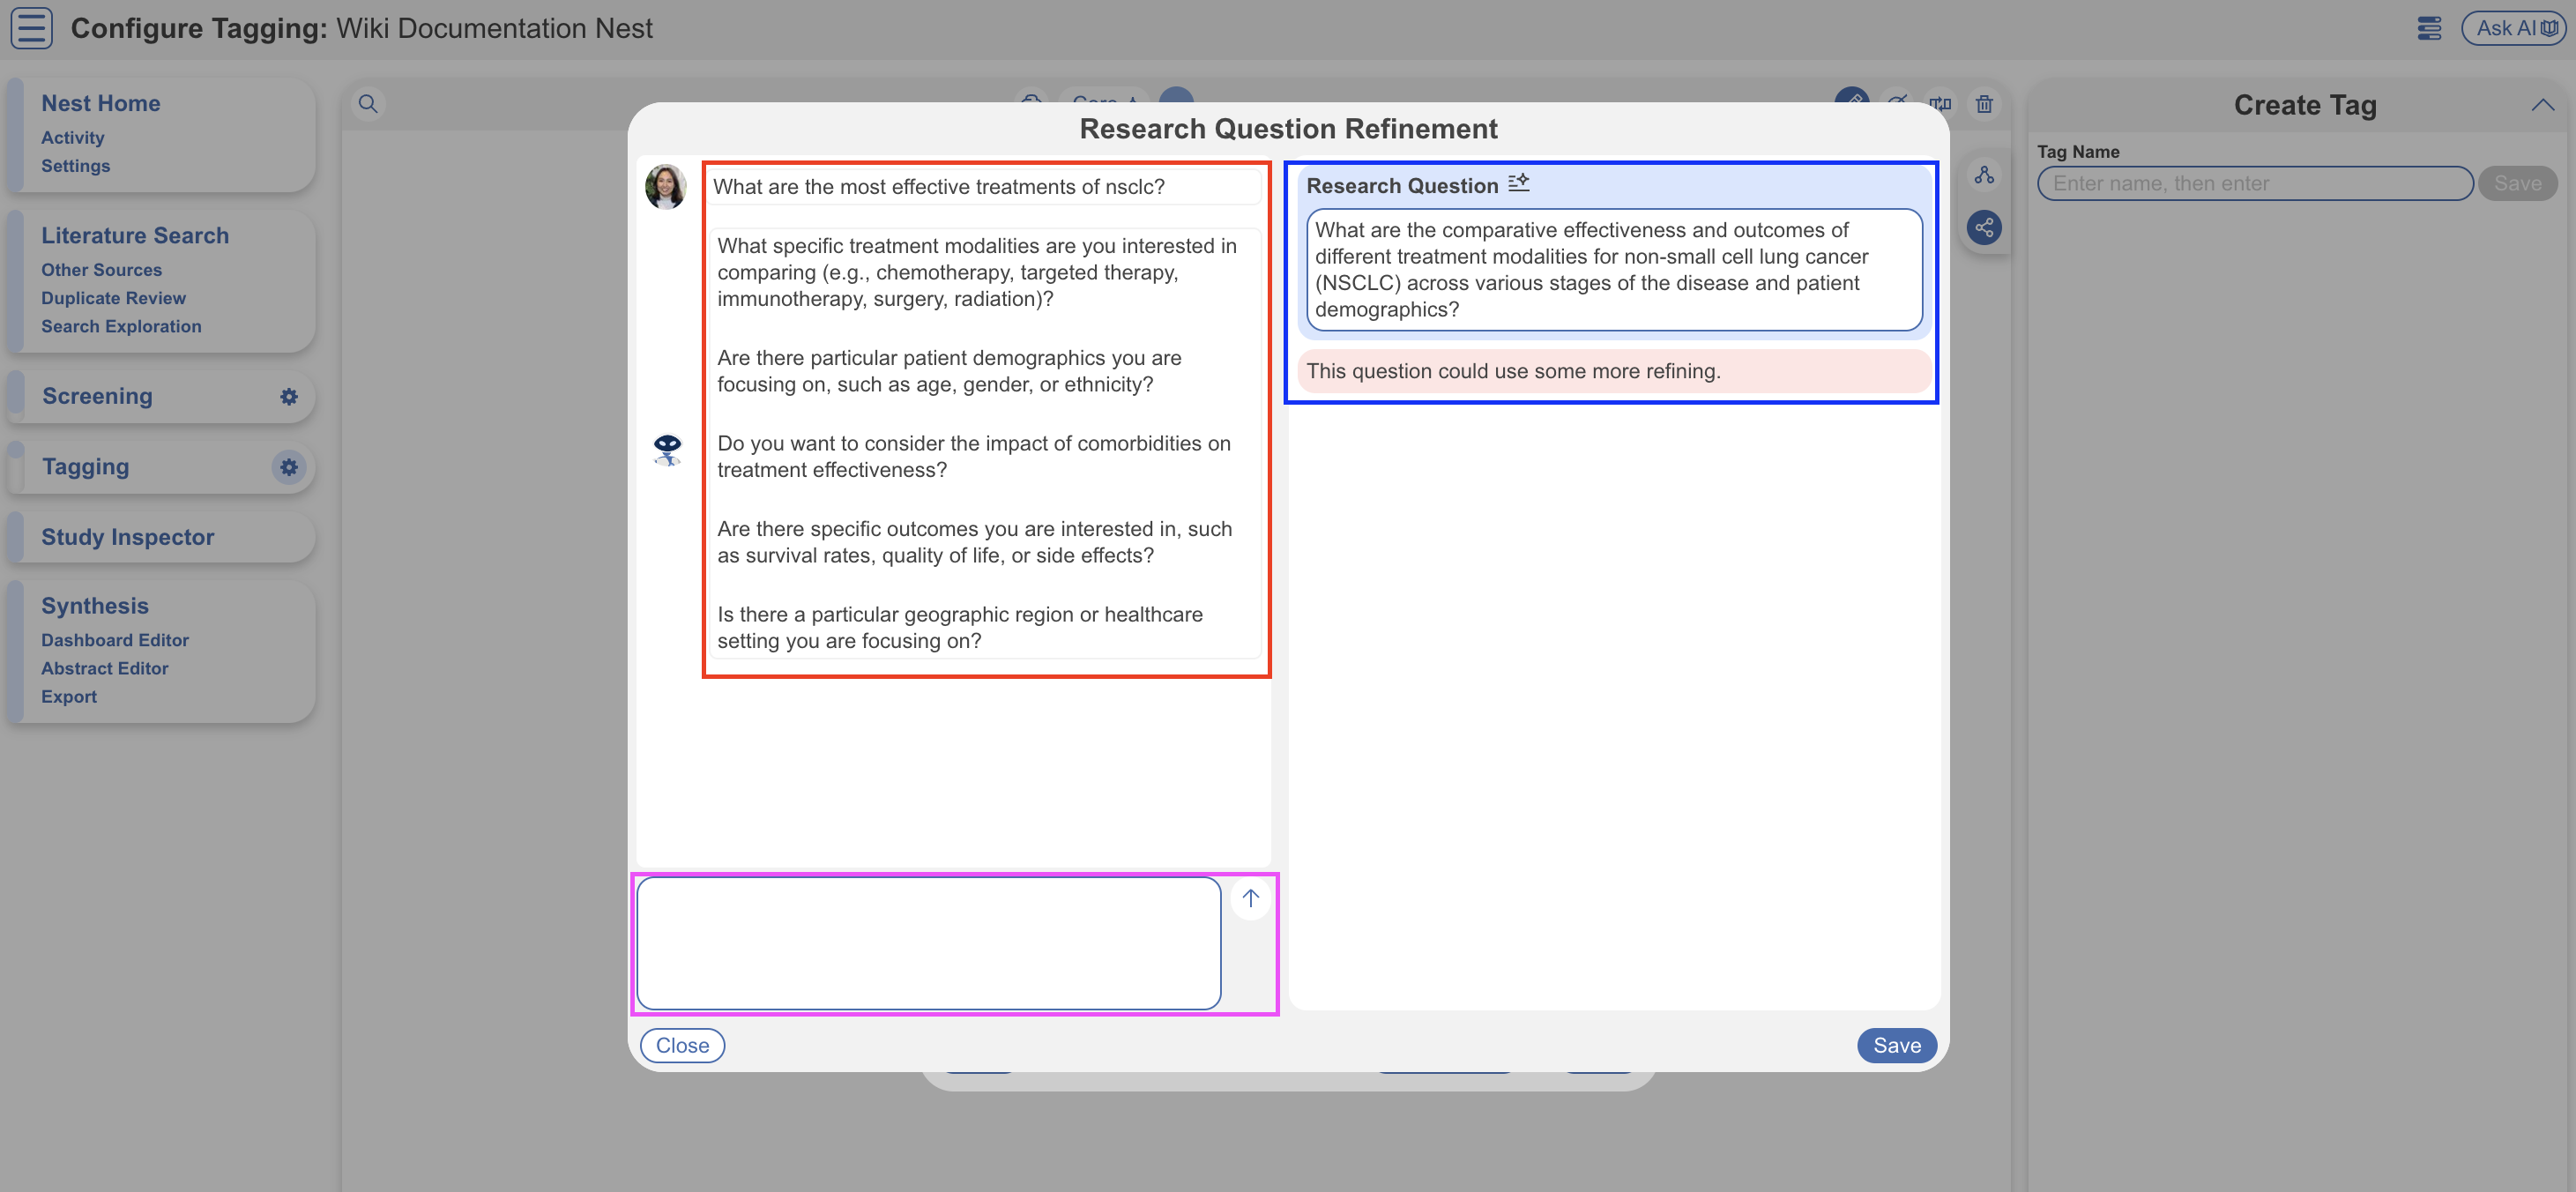
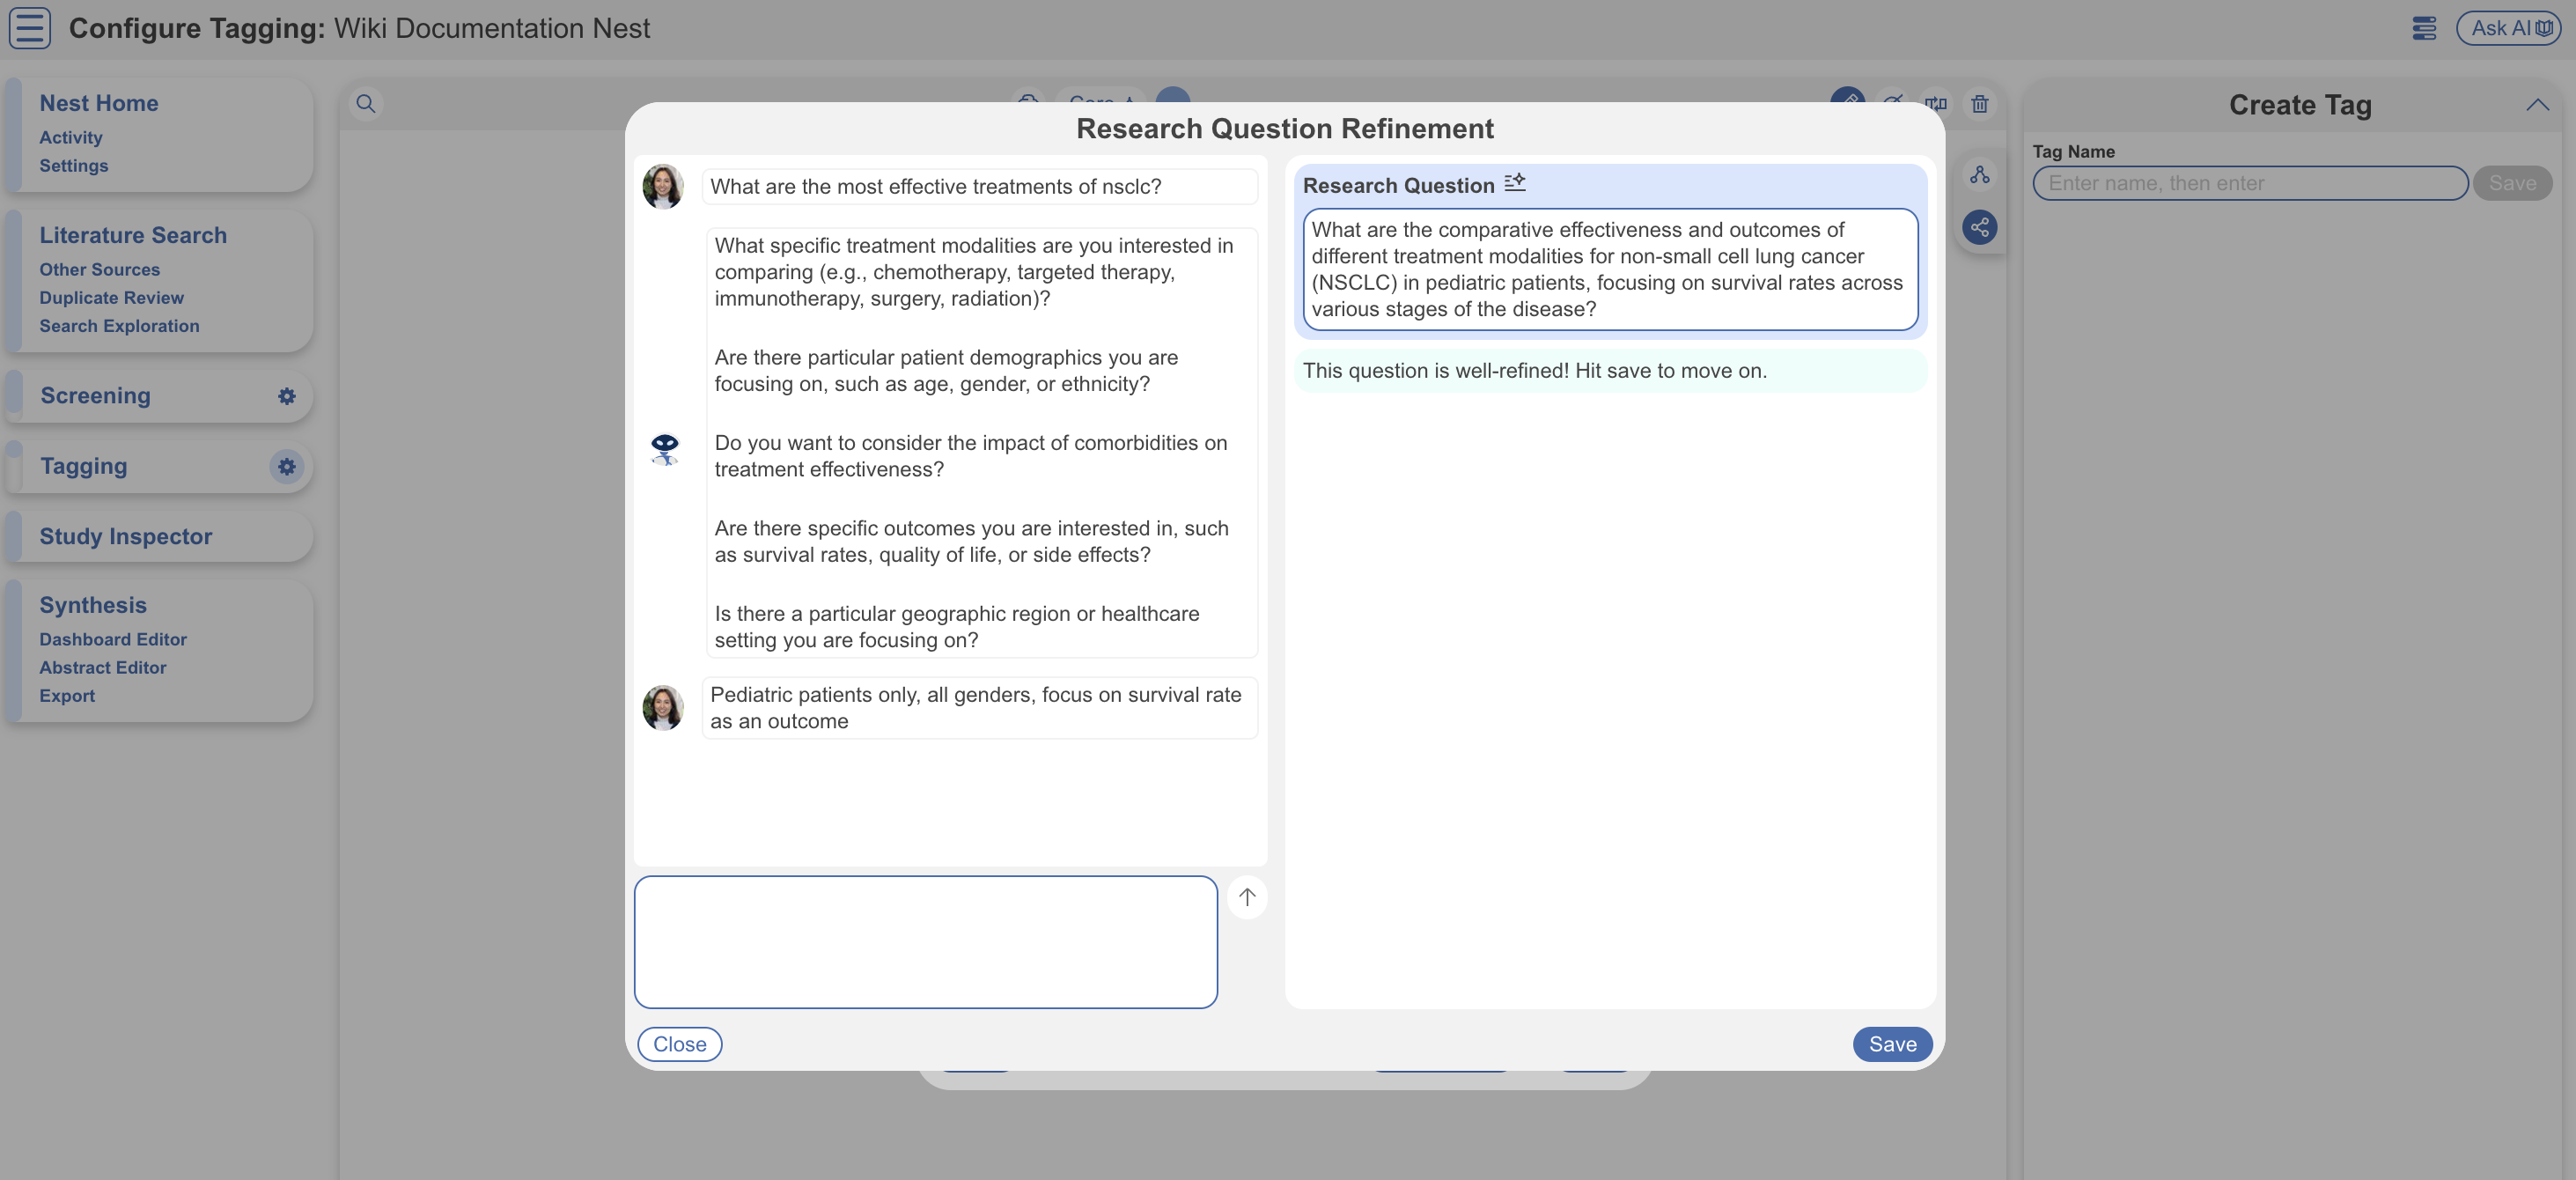
Answer the given questions as applicable until the AI statement determines the question is well-refined before selecting “Save.”
3. Recommendations vs. Auto-Extraction #
Now, you can decide if you’d like the tags/data extracted on PICOs, Study Location, Type and Size to be shown as Tag Recommendations or applied directly to the relevant studies. To determine which to select:
- Recommend: If you’d like to review the data extracted for each tag before applying it, select Recommend. Then, on the Tagging page, you’ll be able to view recommendations alongside the study abstract and only apply tags after you’ve reviewed them.
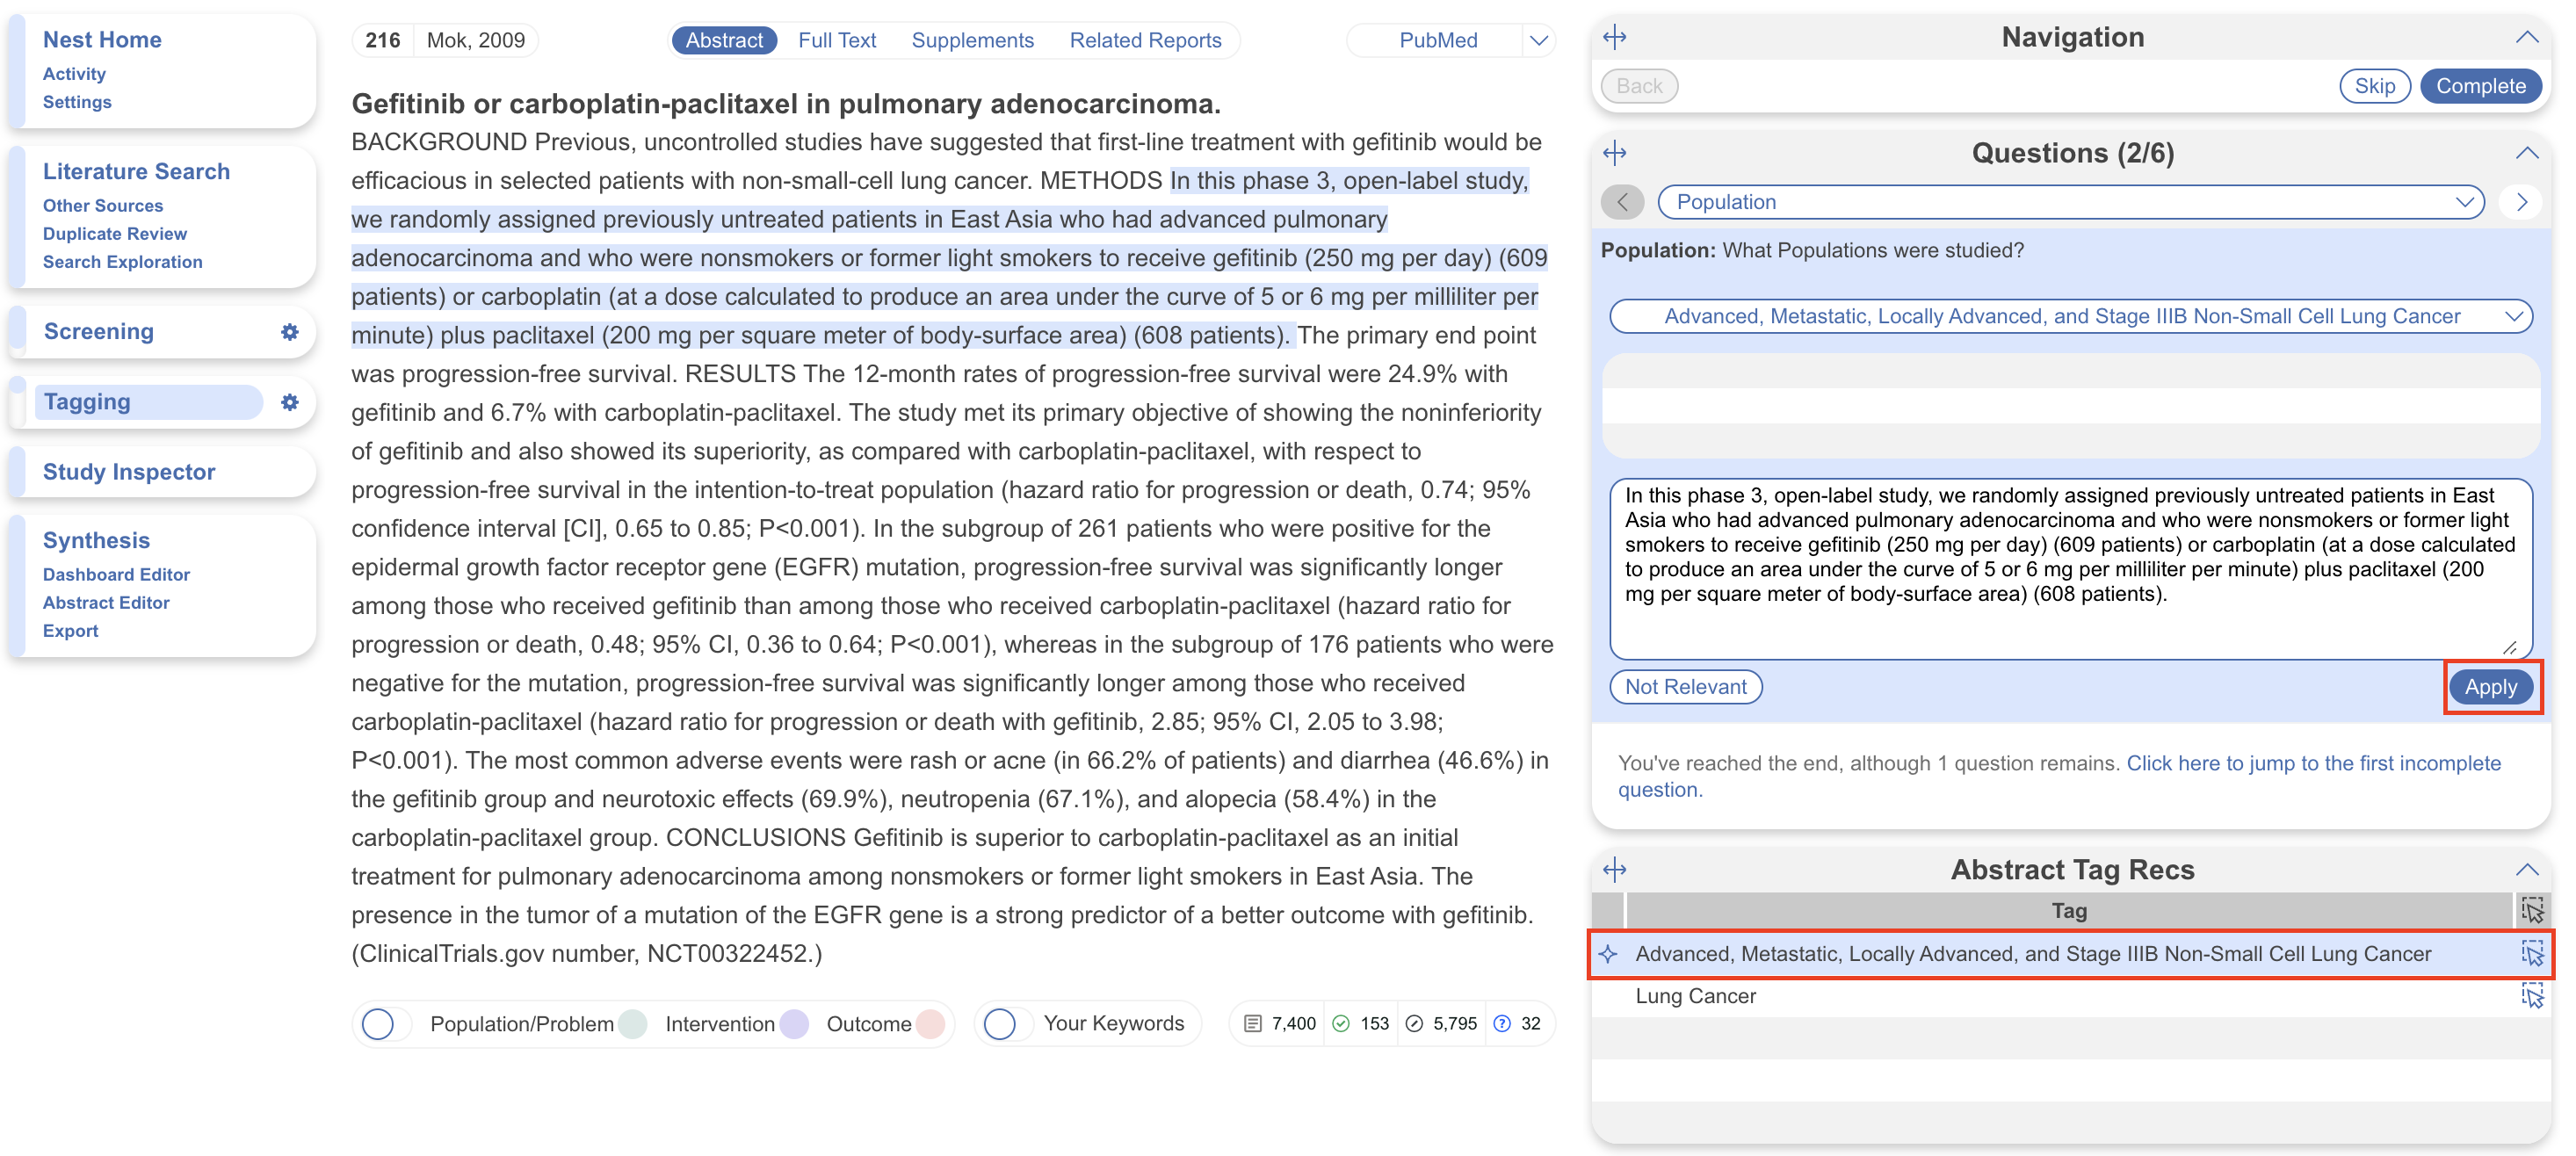
- Apply (preferred for rapid scoping projects): If you’d like to have the data extracted for each tag applied, select Apply. This skips the Tagging stage as the questions are already answered, allowing you to view outputs and download spreadsheets immediately.
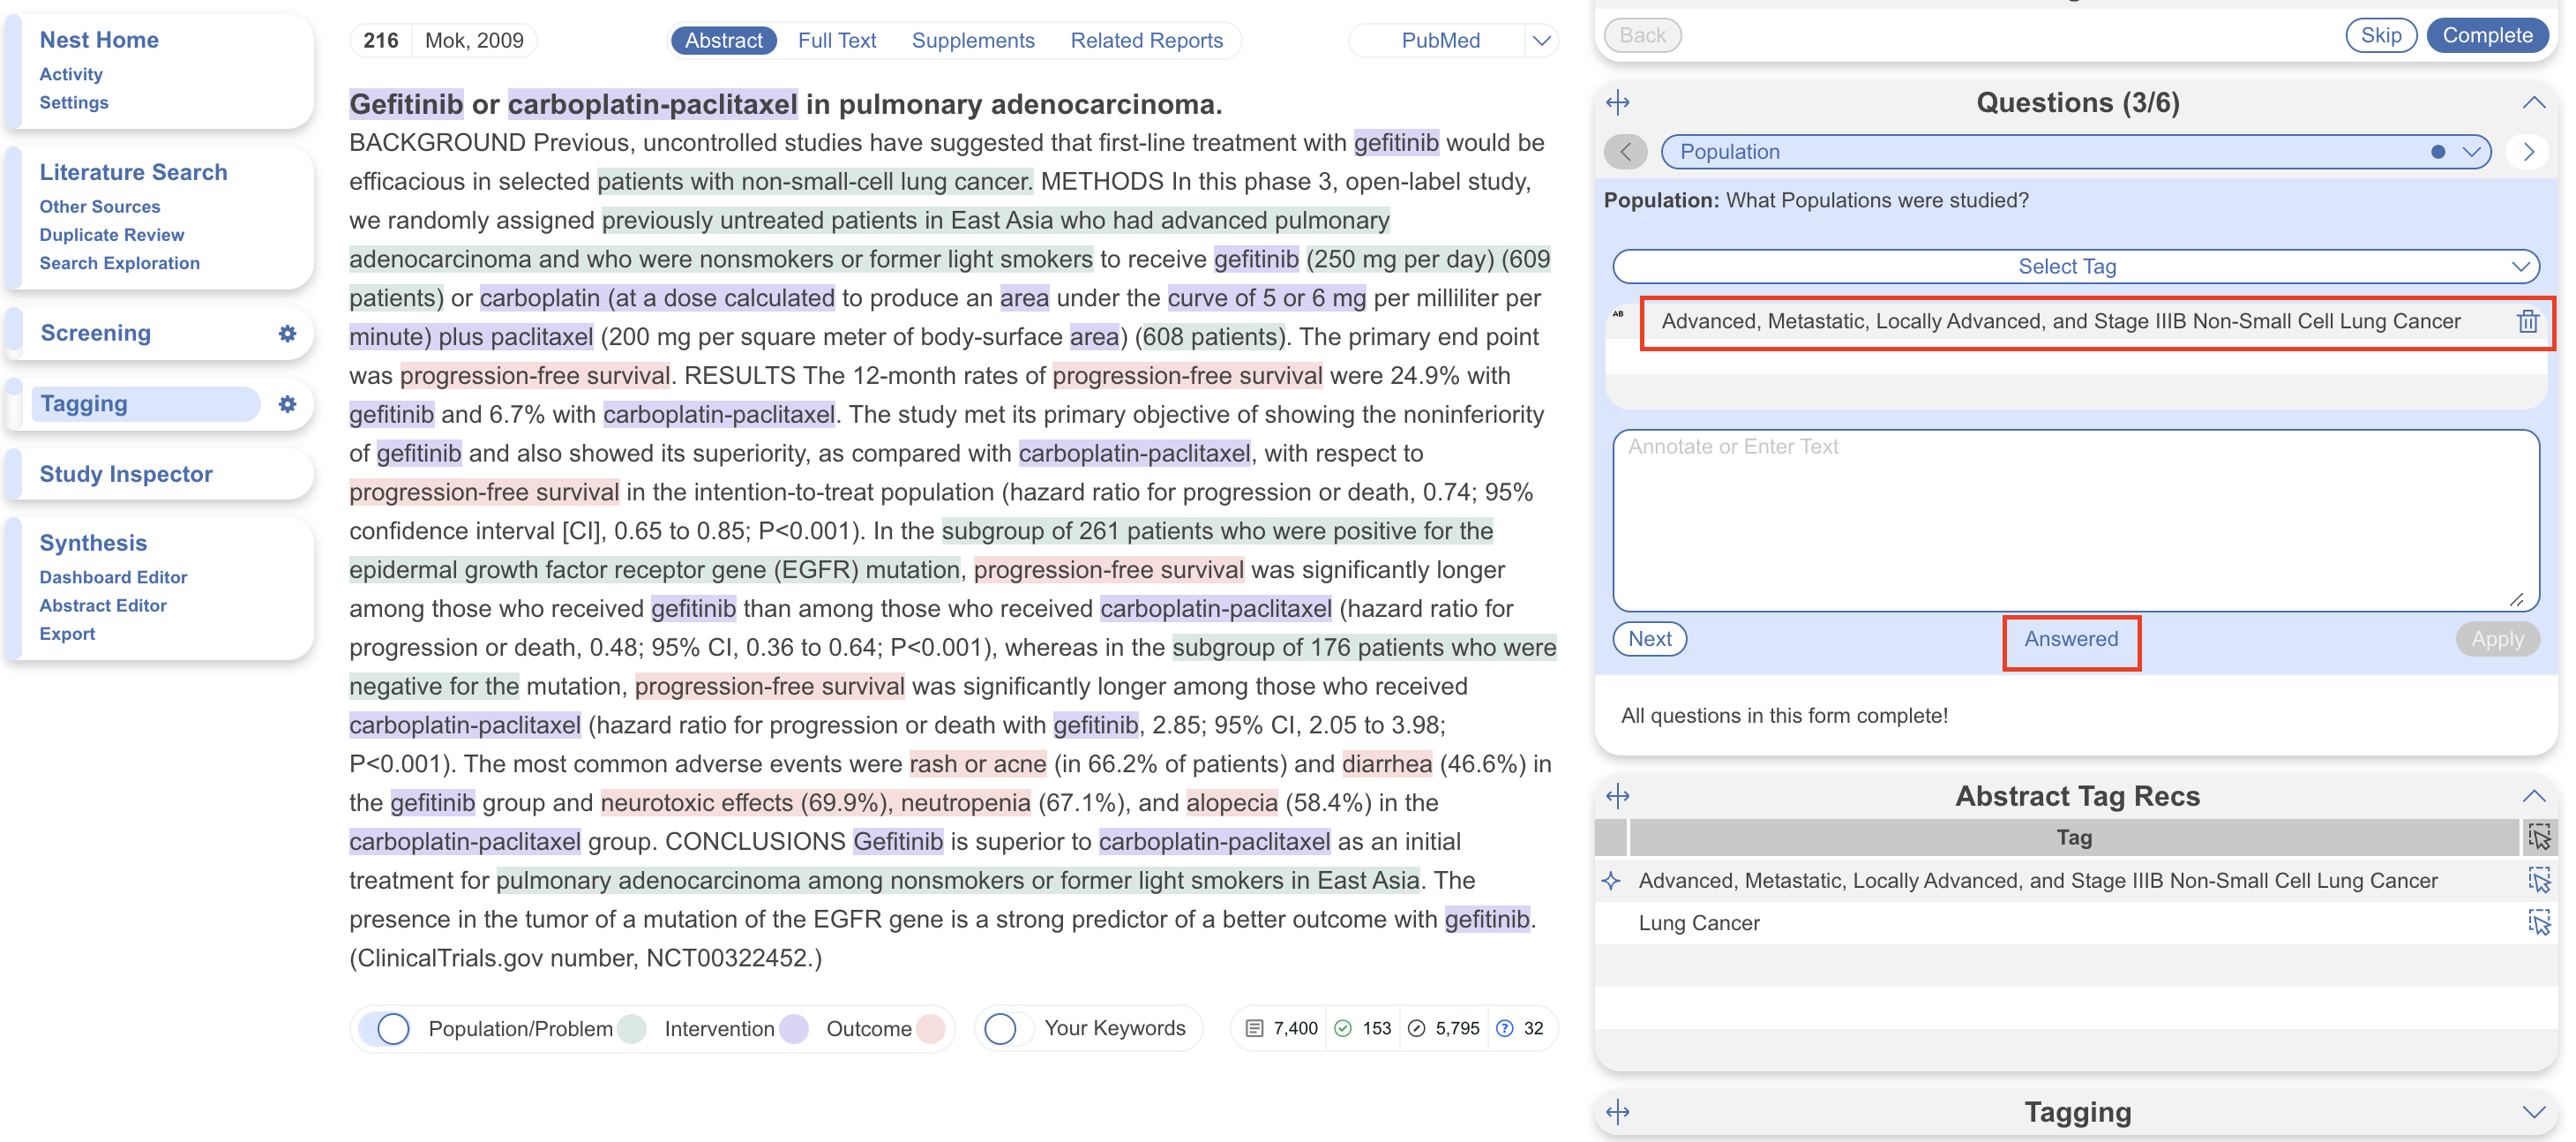
Selecting either action will generate a hierarchy and extract data for all studies’ abstracts in your nest. To undo this action, you can delete the tags in the hierarchy and re-run Core Smart Tags.
4. View the Hierarchy #
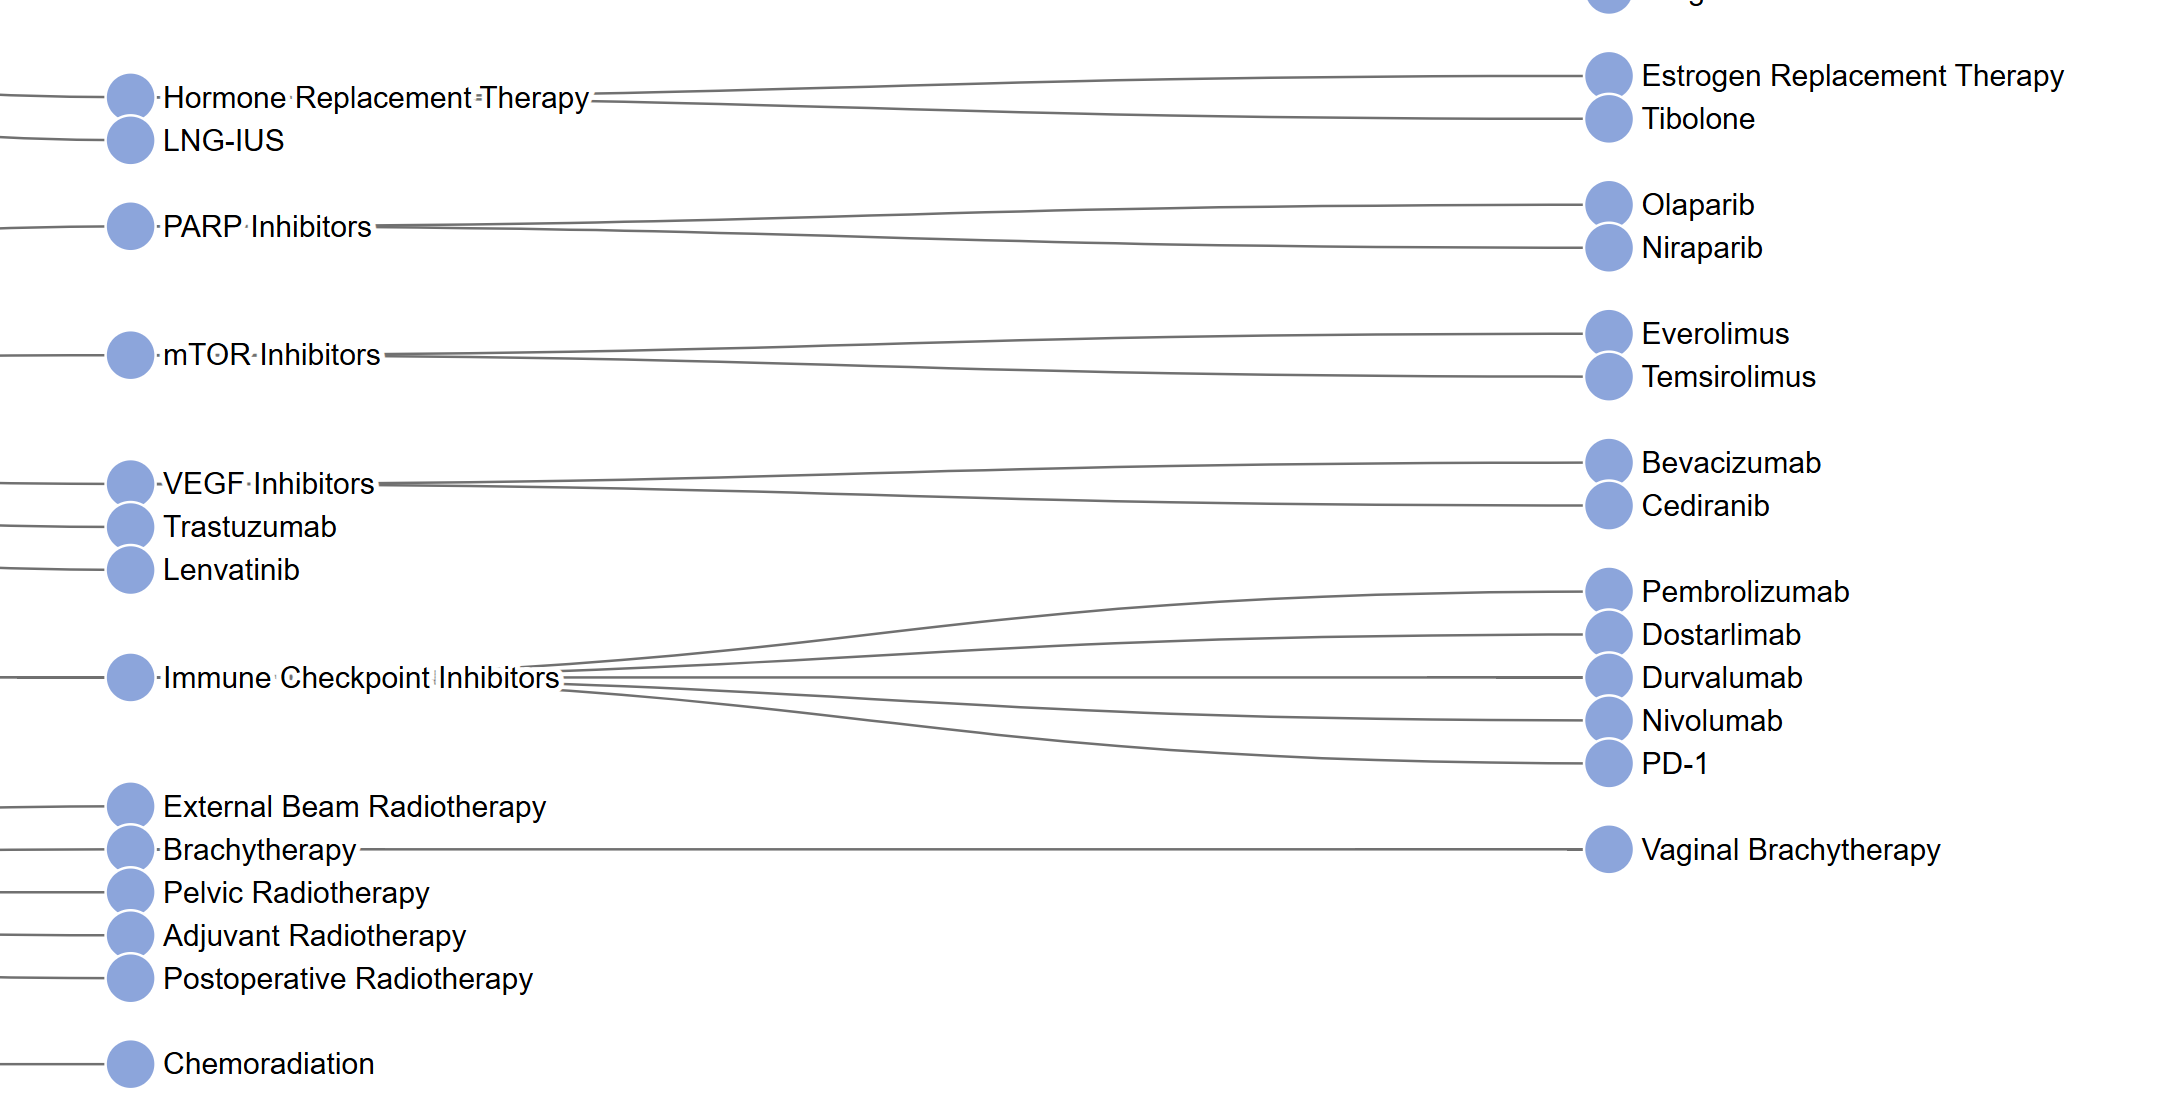
This auto-generates a hierarchy of concepts for you. Each tag comes into your nest pre-configured with a name, content type, and in some cases, child tags arranged hierarchically beneath them. By default, each root Core Smart Tag will be configured as a question. Additionally, every aspect of Core Smart Tags can be modified just like any other tag. This means you can add things like question type, descriptions, aliases, etc. to a Core Smart Tag or a Core Smart Tag’s child.
Note: editing Core Smart Tags does not change the content extracted by the AI.
Additionally, while Core Smart Tags generate recommendations or applied tags as soon as you add them to your hierarchy, you can of course override the individual applications in cases where the Core Smart Tags failed to find the correct answer.
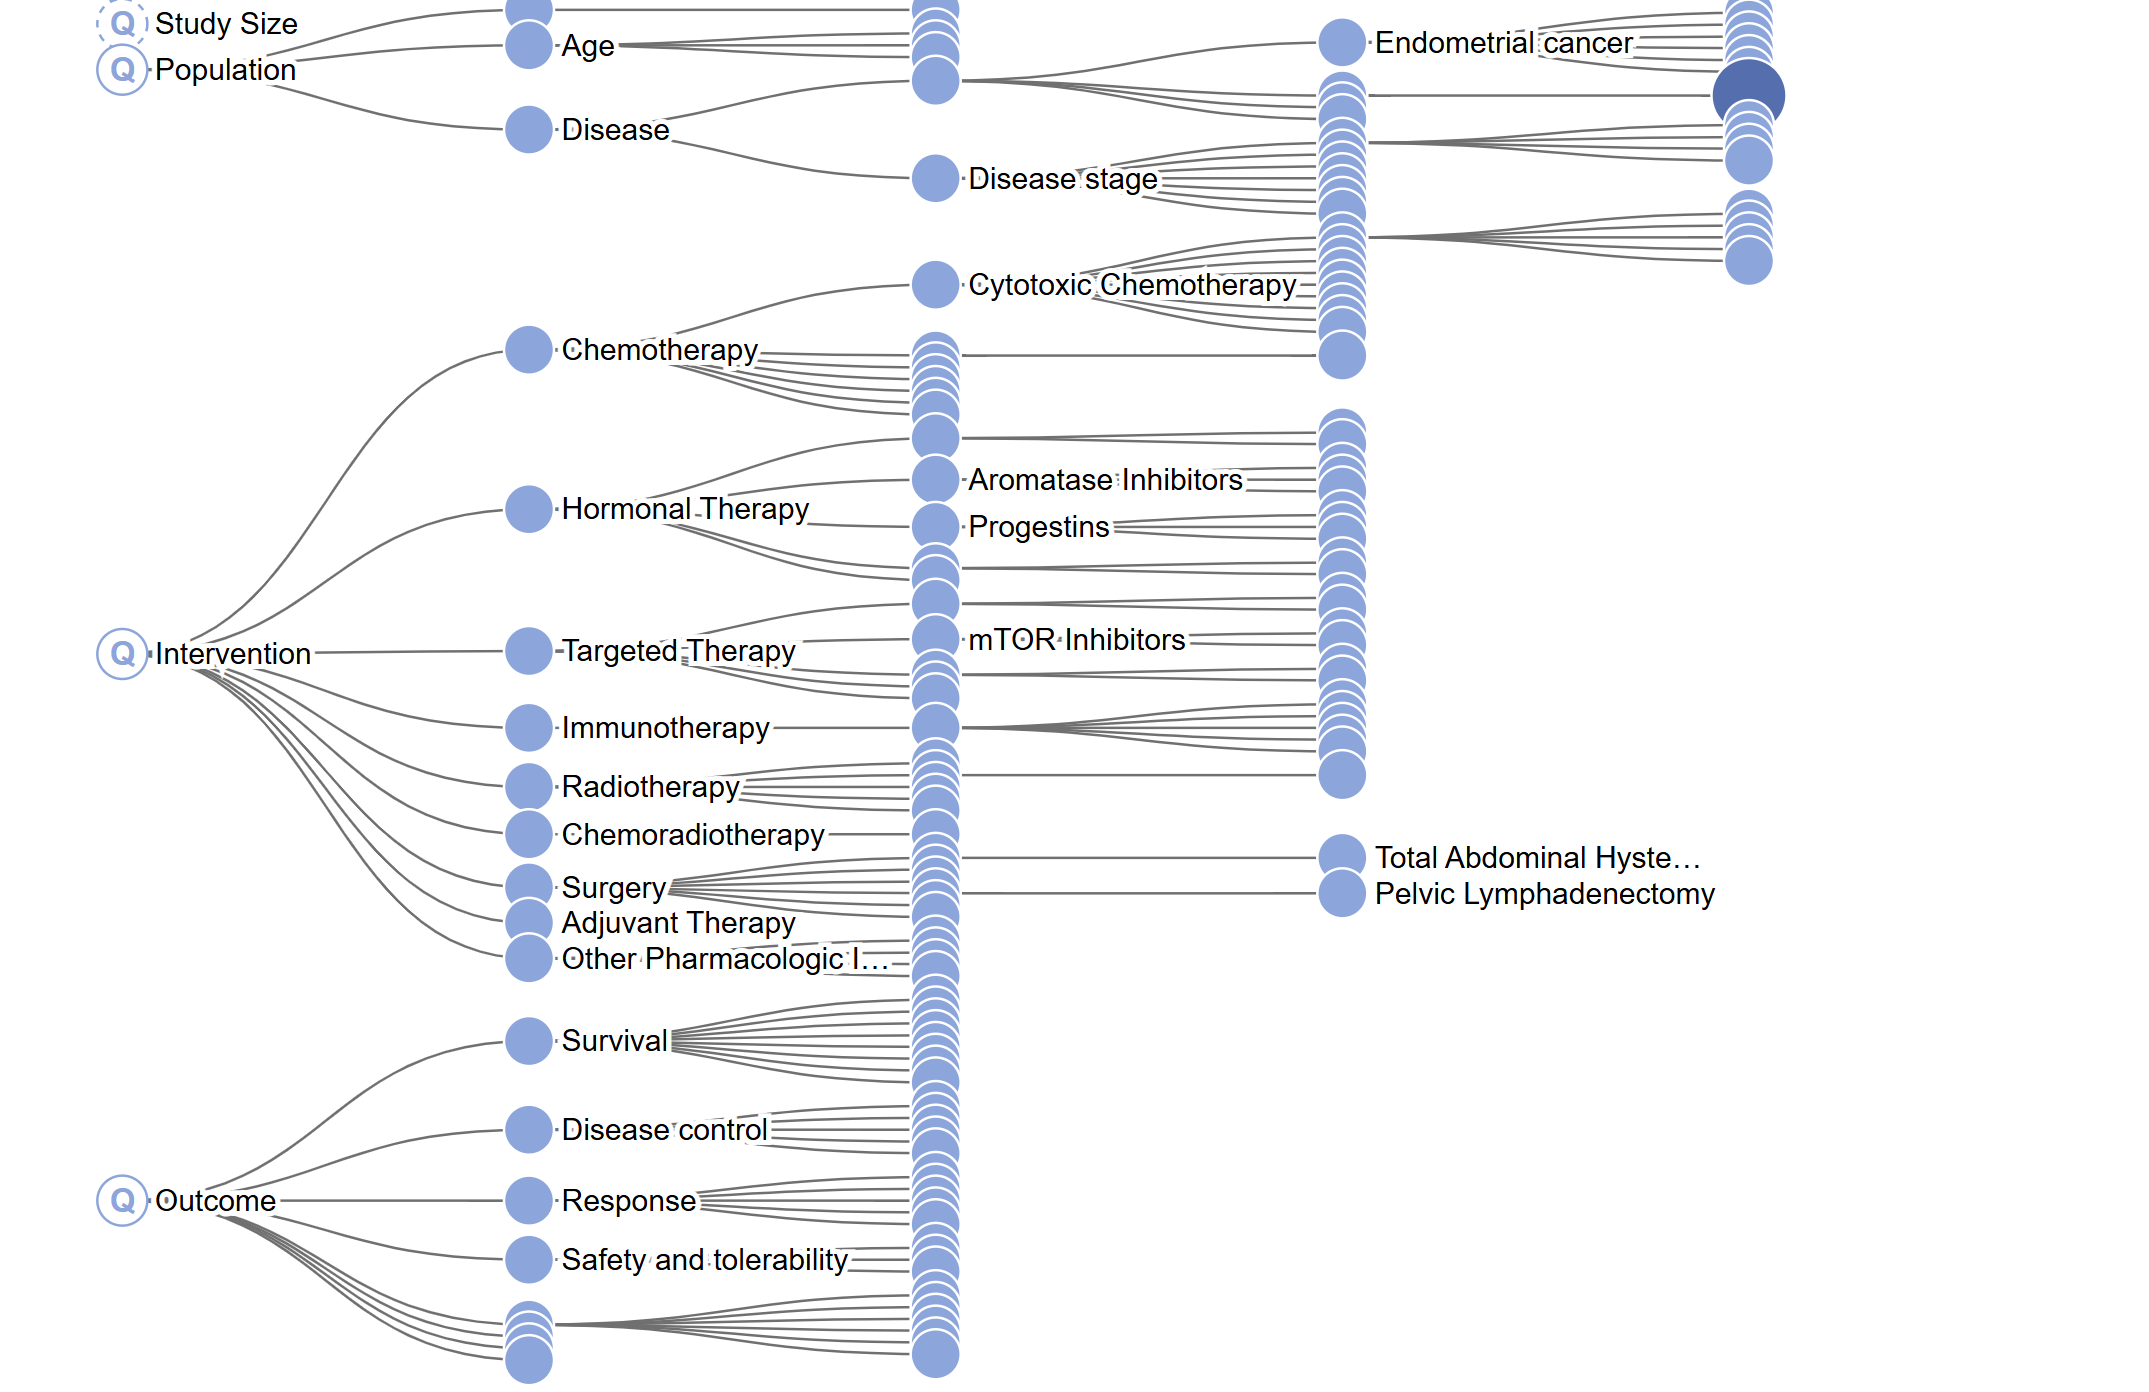
Since the concepts can go into quite a bit of detail, feel free to zoom in to view in-depth.
5. Examine Tags: Snapshot of Extract Tag Contents #
To examine a tag alongside its extracted contents, select the Examine icon (red below). This can be most helpful when Core Smart Tags and/or Adaptive Smart Tags are generated and applied, allowing you to view tag contents immediately from the hierarchy. Either select a tag from the hierarchy (blue), start typing a tag of interest in the text box or use the arrows to select tags consecutively and the options will appear. In the below example, 136 studies contain the tag “Erlotinib”.
By default, the recursive option is selected, meaning the contents shown include both the tag and any child tags. This is most relevant for tags further up the hierarchy. From here, a shortcut to Study Inspector is provided (bottom right) where the tag filter is automatically applied.
Additionally, selecting the individual tag contents will open up the associated study in a similar format to in Study Inspector, allowing you to make edits as necessary.
6. View Recommendations and/or Extracted Data in Tagging #
Core Smart Tags are generated using a custom-built LLM for pre-determined questions and extracts data from Abstracts only; it is different to Adaptive Smart Tags, which uses OpenAI GPT 4 for custom questions for Abstracts and Full Texts.
If you generated CST as recommendations, you can view each of them anywhere you can view Tagging:

To view CST as and when they are applied:
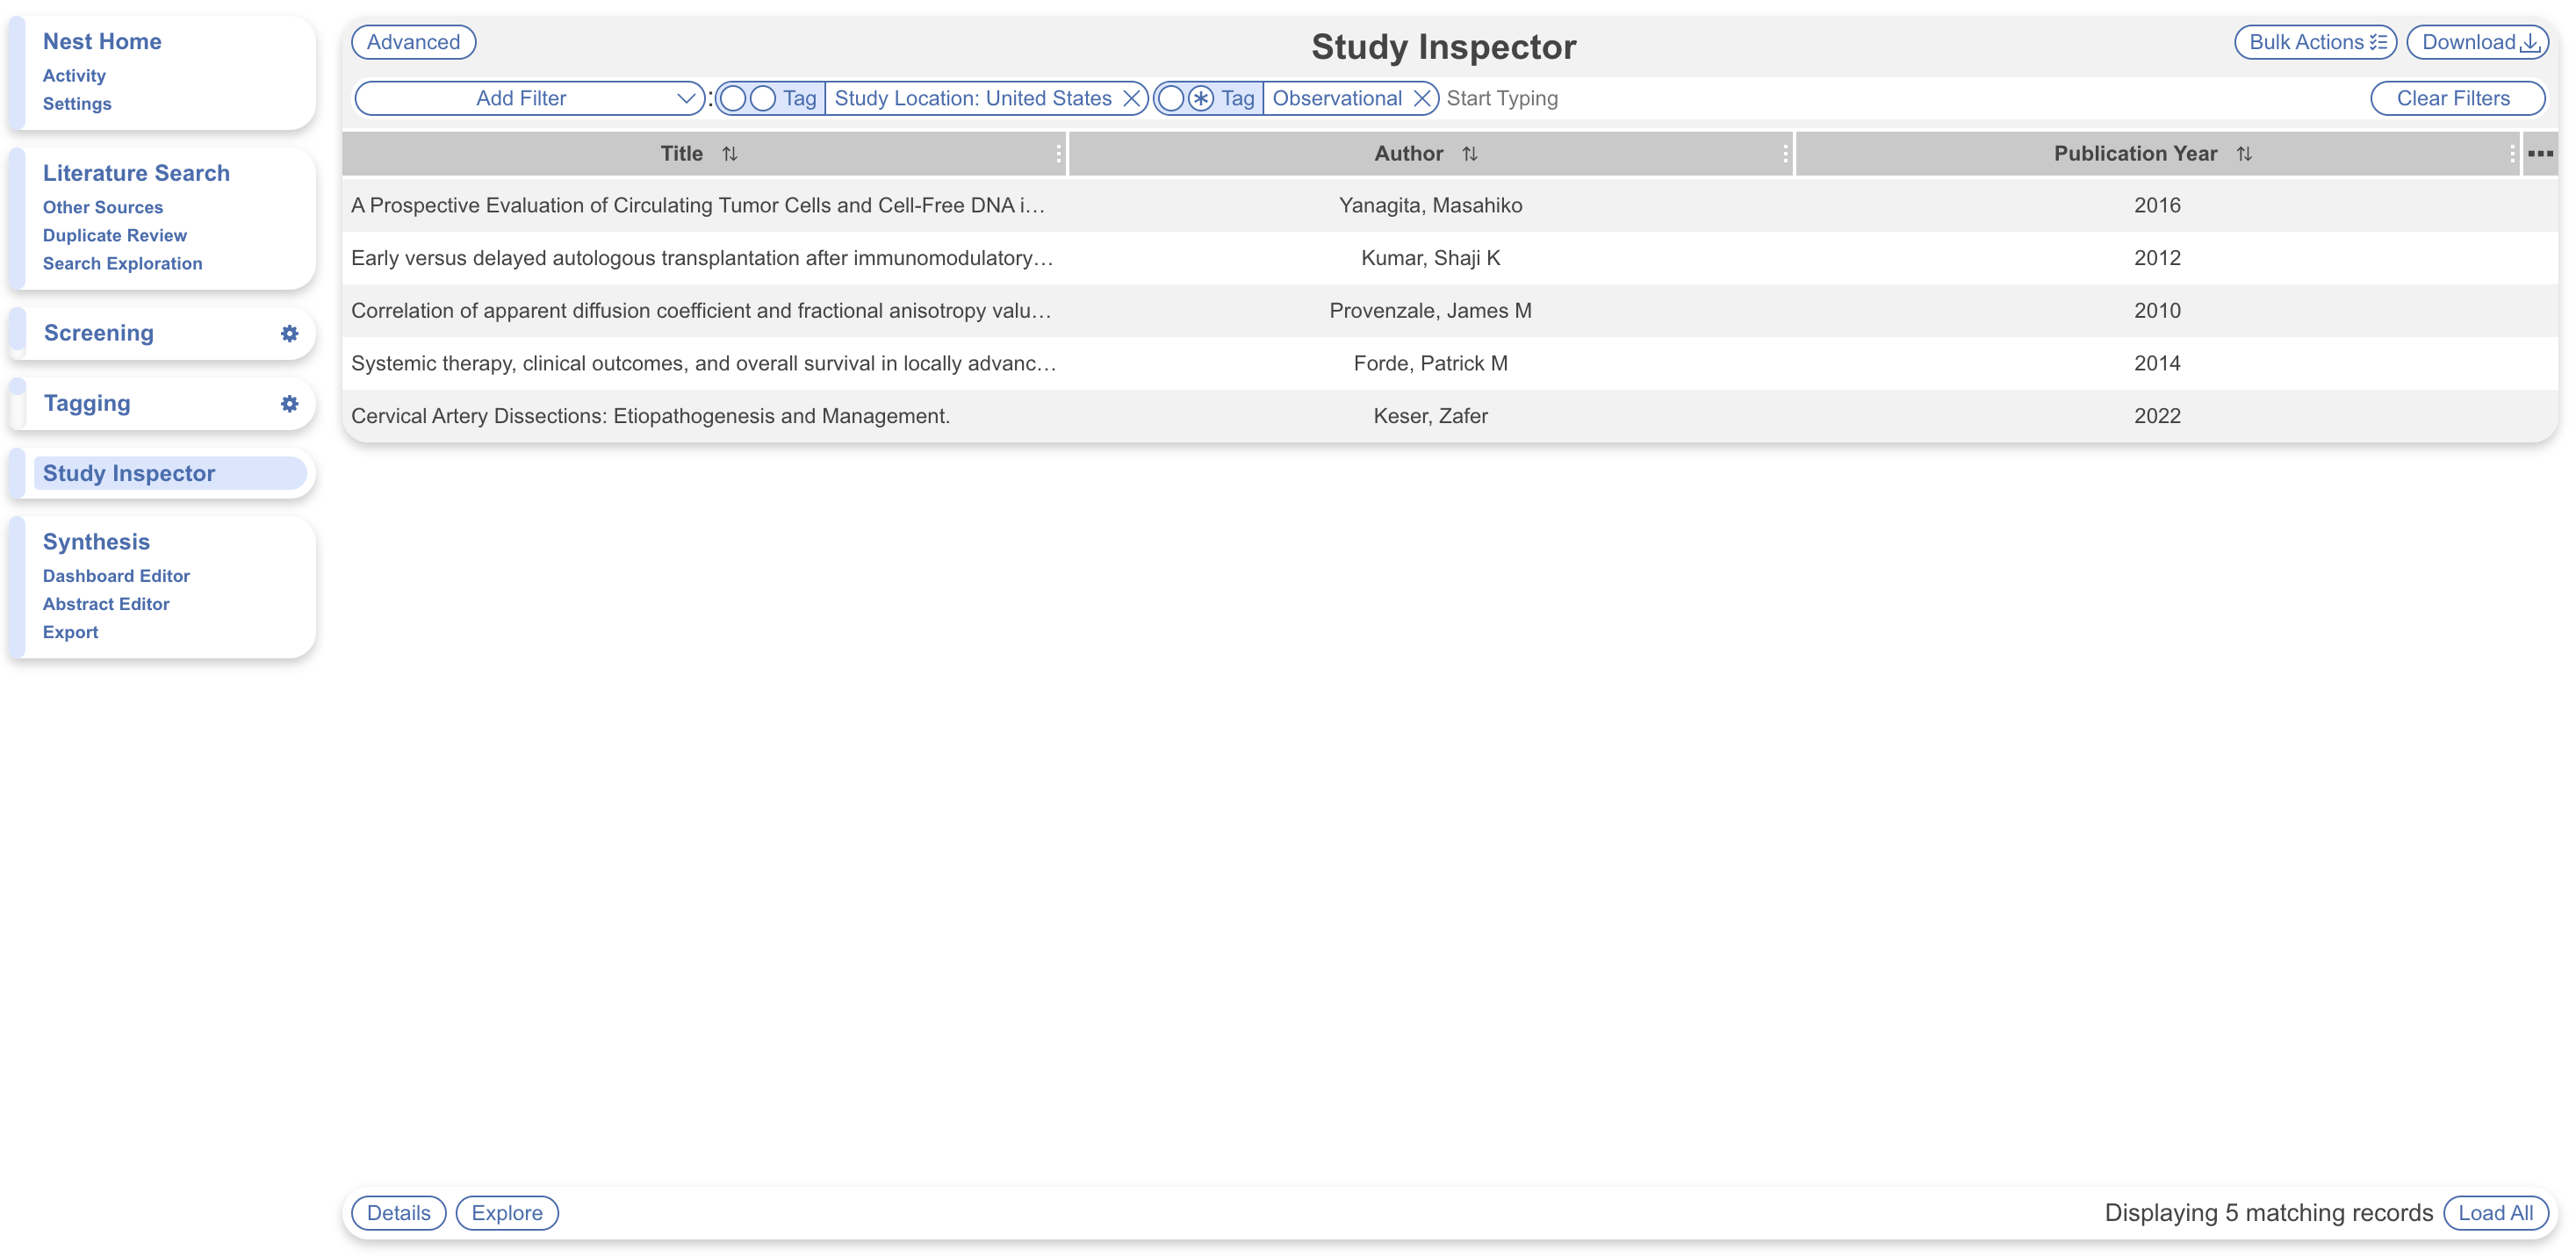
- Filter to these concepts on Study Inspector (in below example, Tag: Randomized Controlled Trial and Tag Contents: Study Location: UK)
- View Qualitative Synthesis Outputs (included studies only)
- Rapidly export collected data (either via Inspector or Dashboard, see below)
In all, generated Core Smart Tags are a fantastic way to scope out an initial SLR, conduct a rapid review, and more!
Dashboard #
After tags have been applied, you may wish to present your data as was available in Search Exploration. In Dashboard Editor, you can add a “Tag” card to display:
- Tags as sunburst diagrams
- Tag: Study Location as a choropleth/map
- Tag: Study Size as a histogram

Validation Study #
In a published validation study, each Core Smart Tags element was tested against existing gold standard datasets.
To validate Core Smart Tags (CSTs), we assessed each individual element against a gold standard dataset. For Population, Interventions/Comparators, and Outcomes (PICOs), the underlying model was tested against an open-source EBM-NLP dataset; for study location, we used ClinicalTrials.gov study locations from NCT-linked studies; for study type, we hand-labelled 1,000 studies; for study size, we tested against the PICO Corpus dataset. In PICOs extraction, the model achieved an F1 score of 0.74. In predicting study type, CSTs had overall F1 of 0.74, overall accuracy of 74%, and achieved 0.96 Recall for finding randomized controlled trials. In predicting location, CSTs had 78% accuracy, Recall of 0.79, and Precision of 0.90. In study size, CSTs had 91% accuracy. Based on these findings (presented at ISPOR 2025), CSTs can be used to develop rapid tagging/data structures and extract evidence from underlying abstracts in a human-in-the-loop workflow.

