The Smart Search function allows you to input and refine a research question, which is then used to create a few PubMed search queries of varying sizes using AI. The query can then be finalized and used to execute an automatic search on PubMed in your nest. This tool works best when you have a good idea of what your review’s protocol and research question looks like and you’re searching only PubMed.
If you’d prefer greater exploration or you’re in the earlier stages of building upon your research question, we’d recommend trying out Search Exploration first. Input keywords, view commonly reported PICOs in the literature, filter by study location and more. There is no expectation in Search Exploration to build a search query, but you can if you wish. You can return to use Smart Search at any time.
How to add a Smart Search #
1. Navigate to Literature Search page and select Smart Search #

2. Input Research Question #
Don’t worry if you don’t have a perfectly crafted research question, simply put a brief statement of what you’re interest in researching and the “Refine” tool can be used to hone in on specific concepts. After adding a research question, you have the option to generate search queries immediately, but we recommend refining to ensure the search query encompasses all relevant records.

3. Refine Research Question #
To refine your research question, select “Refine.”

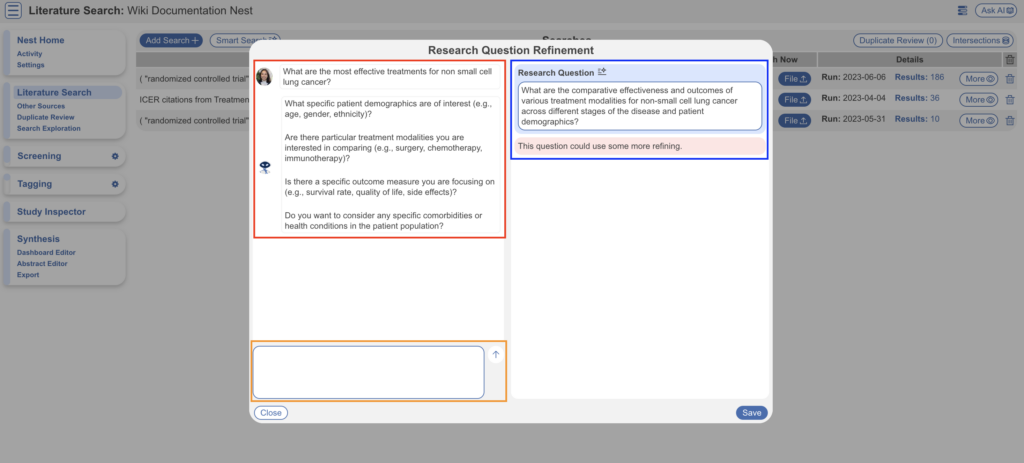
This opens up an AI Chat Bot, which will ask you a few questions to refine your question (red; left-hand side) and make a recommendation of how your research question could be refined (blue; right-hand side). Answer the questions posed by the AI using the text box (orange).

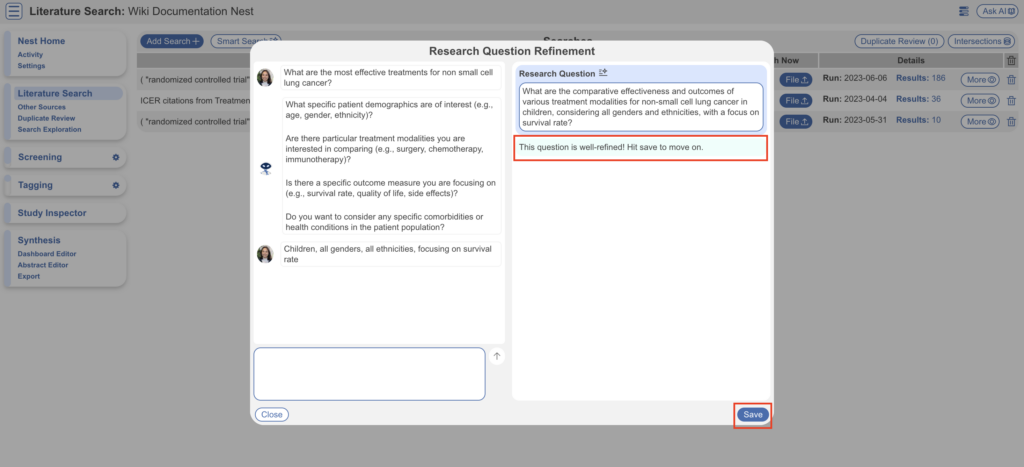
Answer the given questions as applicable until the AI statement determines the question is well-refined before moving on.

4. Generate Smart Search queries #
Selecting Save will take you back to the previous page with the updated research question; select “Generate” to generate search queries.

This process shouldn’t take long, but can be up to a minute or so depending on size. As always, feel free to click out of the modal and do other tasks, and check back into Background Jobs (3 horizontal lines icon in top right) for status.

5. View Searches #
If you’re navigating back to the modal, select “View recent”, otherwise it’ll load automatically.

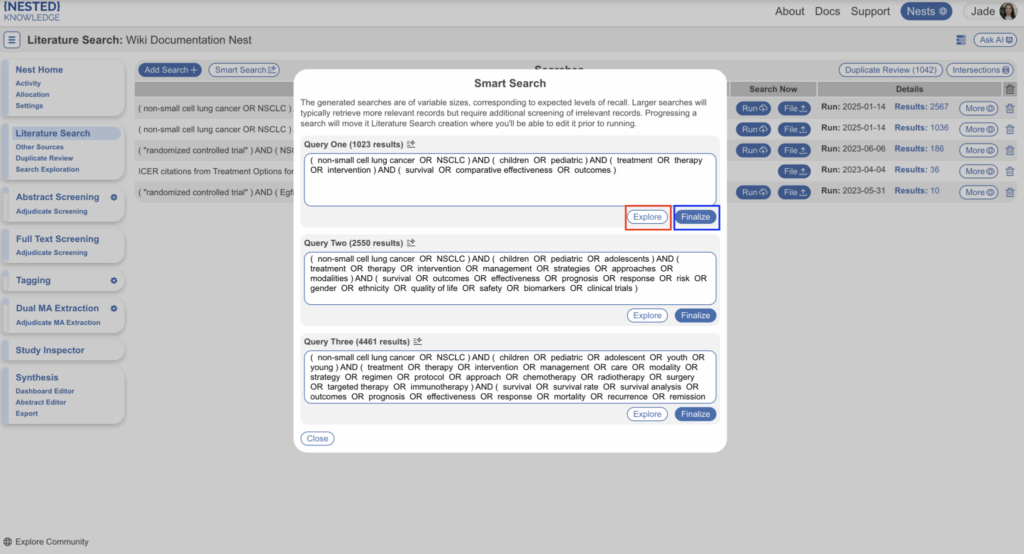
Here you can view three search queries of differing sizes when run on PubMed. At this stage, you may wish to “Explore” (red) the query. This will take you to the Search Exploration page, will automatically input the associated concepts, allowing you to explore the associated literature before finalizing the search. If you have already used Search Exploration, you will be asked if you wish to override the existing terms to explore the Smart Search-generated terms. Choosing to explore a search doesn’t change the query, and Search Exploration will work as normal. To return to the search query, simply head back to Literature Search –> Smart Search.
Alternatively, you can decide to finalize a query to immediately import literature (blue). You will be able to edit the query at the next stage.

6. Finalize Search Query and Add Search #
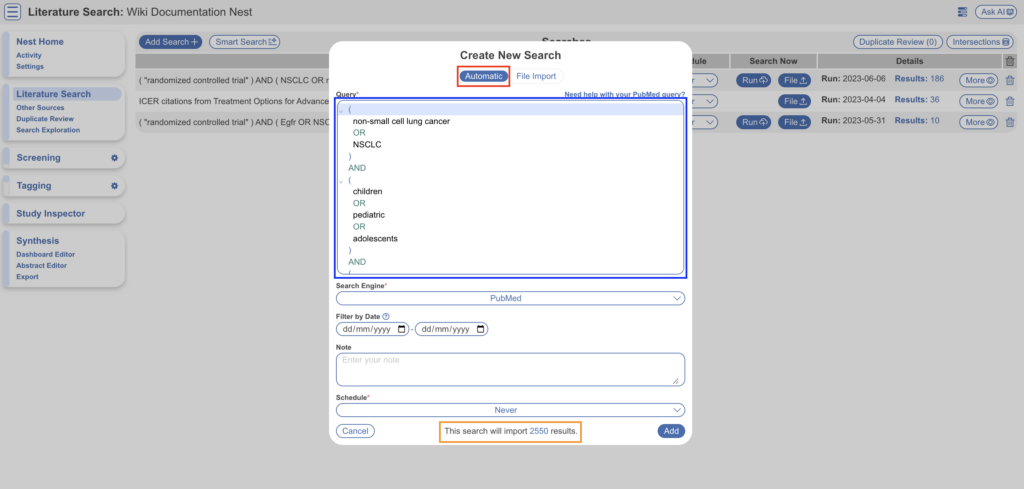
Decide which search query you’d like to finalize and select “Finalize.” This takes you to the Add Search page, with Automatic Search toggled (red), auto-fills the query box with your chosen query that may be edited as you wish (blue) and before adding, the number of results generated is displayed (orange).
While the query is optimized for PubMed, feel free to select another search engine, add a date filter and schedule as applicable. Select “Add” to add the search.

Alternatively, if you decide not to finalize a search query, simply close the modal. The queries will be saved if you change your mind later on and re-access Smart Search.
Feel free to learn more about adding an Automatic Search, and about the Literature Search page in general. But at this point, you have added a search, the next stage is Screening!
Validation Study #
In a published validation study, Smart Search was provided the Objective/Aims statement from ten Cochrane SLRs and recall was assessed.
To validate Smart Search, we sampled 10 Cochrane Systematic Literature Reviews as well as 19 reviews performed in Nested Knowledge on diverse topics, and supplied the Objective statement to the Smart Search AI. The search strategy built by the AI was adopted and run on PubMed, and all results were compared against the included studies list for each review. The results: Based on a single sentence, Smart Search’s strategies identified 76.8% of included records from Cochrane reviews and 79.6% of included records from Nested Knowledge reviews. These results were presented in the ISPOR 2025 Panel: AI-Assisted Literature Reviews: Requirements and Advances.

