You may have a legacy or existing project you wish to upload and continue in Nested Knowledge. To do this, first ensure you have imported your records via a Literature Search. The next step is to upload screening decisions, which will be matched to these records (and will only do so if they already exist in your nest!). Take a look at our instructional video (at 2:35) or scroll for written guidance.
Navigate to Settings #
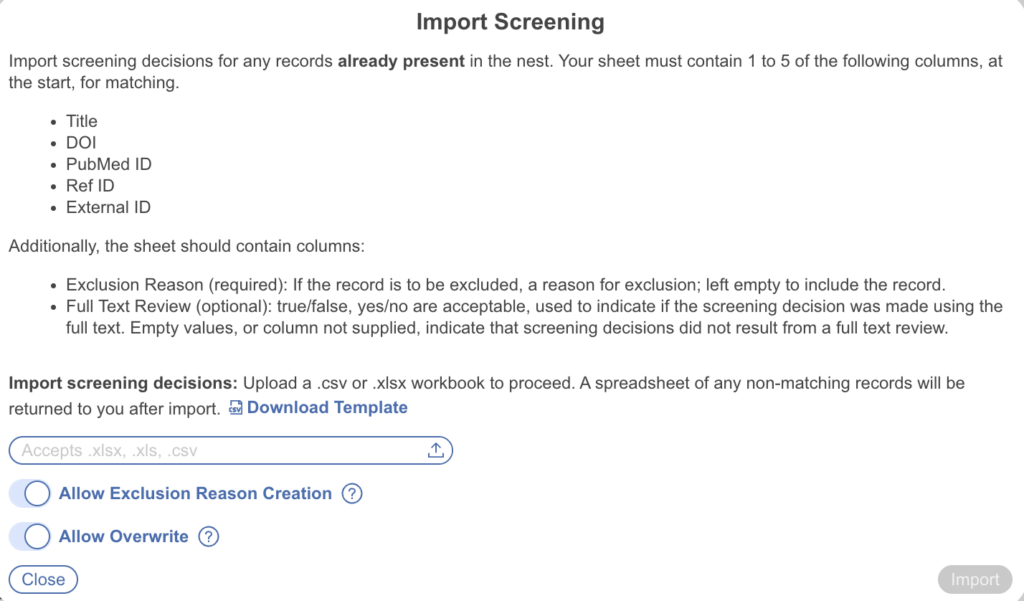
Navigate to Nest Settings, scroll down to Screening –> Import –> Upload data: Begin.

You cannot import Screening and Tagging data in a single sheet; all Import must be completed with only one module (Screening or Tagging) at a time. See instructions for importing tagging data.
Upload a Spreadsheet #
To import Screening Decisions, you will need to bring an Excel sheet or CSV formatted exactly as outlined below. Once you have selected “Begin,” a modal will open showing the ability to download a template, upload an Excel or CSV, and adjust the settings.
Format and Template #
You can download the template from the Import Modal — we recommend this to ensure your spreadsheet’s format is correct.
The titles of your sheet must have the following exact column names:
- DOI
- Title
- PubMed Id
- Ref Id (if applicable)
- External Id
- Exclusion Reason
- [Optional] Full Text Review
You must provide, in those columns:
- At least one bibliographic item (DOI, Title, or PubMed Id)
- For all Advanced/Included records, a blank cell in the Exclusion Reason column
- For all Excluded records, the exact Exclusion Reason
- For all records that underwent Full Text Review, the text “YES” or “TRUE” in the Full Text Review cell.
See below for a correctly-filled-out example sheet (if using Ref ID, this would be an additional column):

In this sheet, only the third record would be Included with full text review, the second & third would be Excluded with full text review, the other three would be Excluded without full text review.
Importing Abstract vs Full Text Screening Decisions #
Using this method imports decisions as final screening decisions. However, if your nest is configured in a Two-Pass Screening mode (includes separate Abstract and Full Text Screening stages) you may wish to import decisions at the Final Abstract level or at the Final Full Text level. This can be done using the Full Text Review column:
- Final Abstract Screening Decisions: If you do not input a “Full Text Review” column, or if the column is included, but all corresponding cells are blank/have no value, decisions will be uploaded at the final abstract screening level
- Final Full Text Screening Decisions: If you input a column a “Full Text Review” column, and corresponding cells state “yes” or “true”, decisions will be uploaded at the final full text screening level
Note: it can be helpful to import screening decisions at the final abstract screening level to train Robot Screener in Dual Two Pass Screening!
Settings: Allow Exclusion Reason Creation #
The first toggle setting determines whether the nest should automatically create new Exclusion Reasons based on the imported sheet.
If there is an Exclusion Reason listed in the sheet that is not already configured in the nest, leaving this setting toggled “on” will automatically create any missing reasons. If you would prefer that no new Exclusion Reasons be created in your nest, toggle this setting off.
If there are any Exclusion Reasons that do not exactly match Exclusion Reasons in the nest, the import of records with those non-matching Reasons will fail import and a list of records that failed Screening import will be displayed to you.
Settings: Allow overwrite #
The second toggle setting determines whether the decisions in your import should override decisions already present in the nest. That is, if you want any existing Exclusion Reason to be replaced by the imported decisions, leave this setting toggled “on.”
If you would prefer that existing decisions be left (and not overwritten), toggle this setting off. If toggled off, no overwriting will be completed over existing decisions.
Be careful about this action, because no report will be returned regarding overwriting of records!
Import Screening Decisions #
Once you have ensured that your import sheet is the proper format, upload your sheet by drag-and-drop or by selecting the Upload button. Any decisions that do not get matched to records will be returned as a spreadsheet; be sure to view these and either assign decisions to records manually or alter the spreadsheet format if incorrect in the initial upload.