Before you dive into all that Nested Knowledge (NK) has to offer, you should understand the two-fold nature of the software platform: AutoLit, and Synthesis. AutoLit is the workflow portion, enabling researchers to generate high-quality evidence, like systematic reviews and meta-analyses. Synthesis is the visualization, sharing, and publication portion of the platform. This article focuses mainly on AutoLit, but you can find more information on Synthesis and how the two sides of the software work in tandem here. As a user of Nested Knowledge, your main job is to work through the AutoLit section of the software. It has six modules. The bulk of the work comes from the screening and tagging sections, while the literature search and synthesis are important steps in their own right.
If you’re not familiar with what a systematic review is start here! https://wiki.nested-knowledge.com/doku.php?id=wiki:guide
The first thing that you should do before starting the journey is to make a plan using the Study Design tool on the Nest Home page. This is a great way to map out your search and the steps that you will need to accomplish the goal of the nest. You have a big task ahead of you. If you’re completing a nest (NK’s term for your project or review), creating a plan in the form of a written protocol is a good practice if you’re lone-wolfing it, and essential if a team is taking on a nest. This helps you break down the goals and work of the nest, while giving you and your team a more efficient and effective process. Drafting and revising a sound research question is integral to making the action of completing a nest a little easier.

When searching databases, such as PubMed or the ClinicalTrials.gov database through NK, you are able to plug multiple queries into a single greater search. You could use one query or several, either way, you go, the software will pull different results based on the variations of searches. With each search you add, the system will show you the number of records found for the search you made, whether that search returned 10,000+ or 73. Generally, we recommend starting with a small search to make initial screening feasible, then casting a wider net to make sure you’ve captured all records of interest. There are a plethora of ways to get started searching with NK!
You can add searches you’ve formulated in external tools with a quick copy/paste, or formulate one in your own words. Additionally, If you have a landmark study whose references you’d like to use as a starting point (we call it bibliomining), or a collection of studies you’d like to include right off the bat, feel free to upload those and bulk include as well, see the next tip!
Bulk PDF upload – Basically, you can upload one or more full texts in PDF format from your computer. AI will attempt to match those PDFs to the records returned by your search. If the PDF matches the record, then we attach the PDF to the record. This saves a ton of time on those records that aren’t open access Alternatively, if you know you want to include these full texts as expert additions, you can simply upload them to create new records as an expert addition. The same AI will intelligently pull metadata and bibliographic information to ensure that the record is as complete as possible.
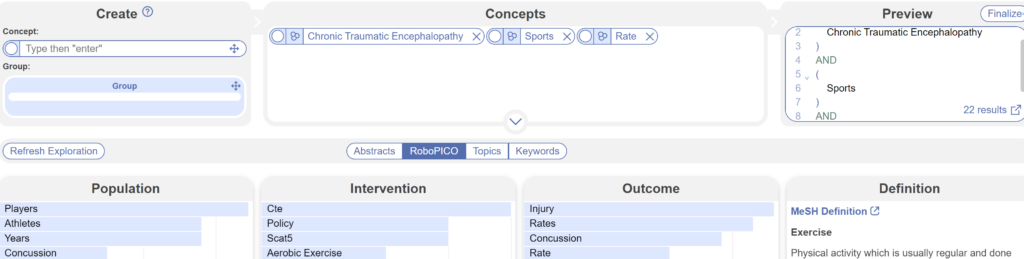
If you need help formulating the ideas to search for from scratch, use the “Search Exploration” tool, more on that below!
If you already have your perfected query, Lit Search is the place to go. Not sure where to start your question? Totally fine! Use the search exploration tool and start exploring different topics. No need to have a completely fleshed-out query. If you have a concept in mind, plug that in under the “create” box. If you have two ideas you are trying to link but don’t know exactly how they work together. Use the “Group” function to link ideas using “And” or “Or”. Depending on how specific you get with your inquiries, NK’s software can show you how many records you’ll get to look at. Add or subtract from your concept list to refine your results or produce new ideas!
In the screening process, when thinking about different studies to include or exclude from your nest, some find it easiest to start with the “configure screening” section. You can select keywords and exclusion reasons before you start screening, or add them on the fly as you screen through. To better map out what you want to achieve within the nest, the former method would be ideal. However, if you’re going through the screening and something comes up that you think should be excluded, jot down that reason when you come to it. It’s a fluid process. You don’t have to know all the exclusion reasons and your keywords prior to screening. They can be added at any time while you screen.
Unfortunately, Nested Knowledge cannot give access to full texts that are behind a publisher’s paywall. However, we do allow one-click downloads of open-access references via Unpaywall.org. For everything else, you can go to the link and upload the text after it’s purchased, or even upload an entire folder of purchased full texts as previously mentioned.

The tagging process can take a long time and be a slippery slope to navigate. Don’t fret! It can take a while and that’s just part of generating high-quality evidence. While the process of extracting data can feel overwhelming, NK makes it possible to design complex, hierarchical relationships between qualitative and quantitative data, and in many ways, tagging is where your study design truly begins. Where traditional ontologies become vague or overly broad, Nested Knowledge steps in to give you the ability to create your own ontology. We suggest that you start with the “configure tagging” section and go from there to better set up your thought process and your goals as you go through the tagging process.
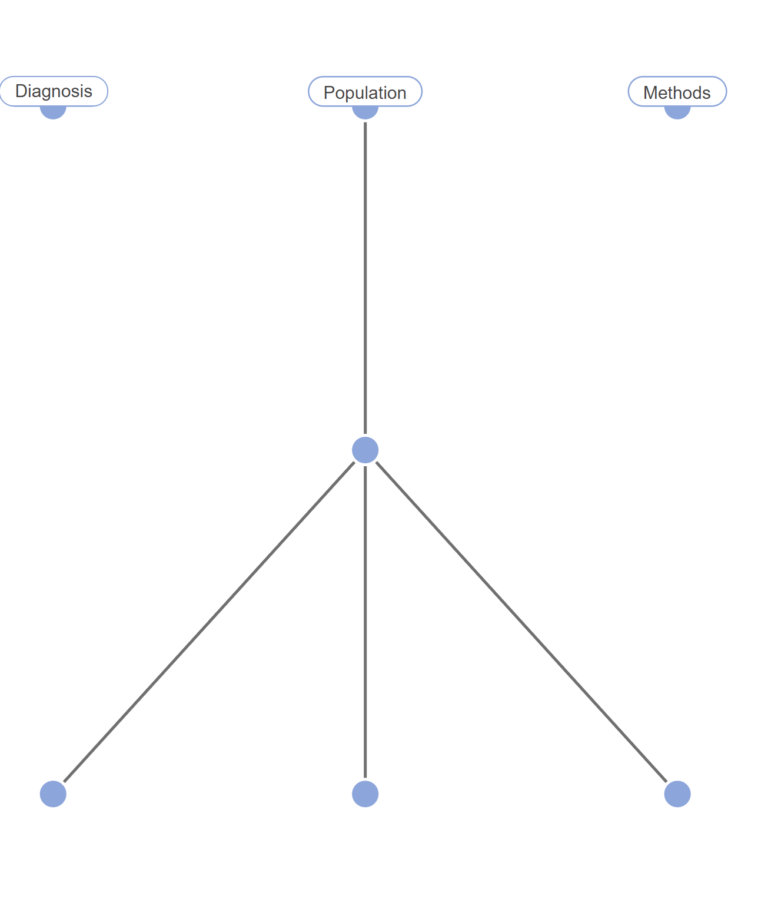
When setting up your hierarchy, Start with the root tags, and work your way down, adding child tags to show the relationships within the literature. For example, you might go from a parent tag of “Population”, and connect that to “Age”. and another step down from that you could have “Under 18” or “Over 65”. While it is possible to add tags on the fly, determining the concepts you care about upfront will save you time down the road, and ensure you’re fully answering your research question and adhering to your protocol.
There are a variety of tag types, and two distinct tagging modes Standard tagging mode allows you to view and apply tags from a hierarchically organized list of tags. Forms-based tagging allows you to turn some tags into questions, and other tags into answers. When extracting data with multiple components, table tags enable you to gather multiple pieces of information under one tag without resorting to a mess of linked spreadsheets. If conducting a meta-analysis, the intervention and data element tags are used to identify the interventions and comparators of interest, while data elements are used to gather quantitative data (whether continuous, dichotomous, or categorical) from each record.
There are lots of variables to the process and what you want to be tagged, is ultimately up to you. Take one or two articles at a time and be thorough in your work. It’s a long road to completing a nest and tagging is part of that.
Study Inspector is a great way to go through your studies again and be able to screen, tag, or extract anything that you may have missed. Have a study you wish was excluded but already completed your screening? Boom. Study Inspector’s got it. Have some info you wish you tagged but already went through all of your tagging? Boom. Study Inspectors got it. It also gives you a complete list and overview of every study that came up in your search. Filter by author, year, or even whether you included it. Study Inspector allows you to go back and fix small mistakes or even big ones. You can use the bulk action feature in the study inspector to change things in the screening and tagging after it has already been completed. Want to remove a tag on studies completely? Boom. Study Inspector’s got it. Want to update your screening of excluded or included studies? Boom. Study Inspectors got it.

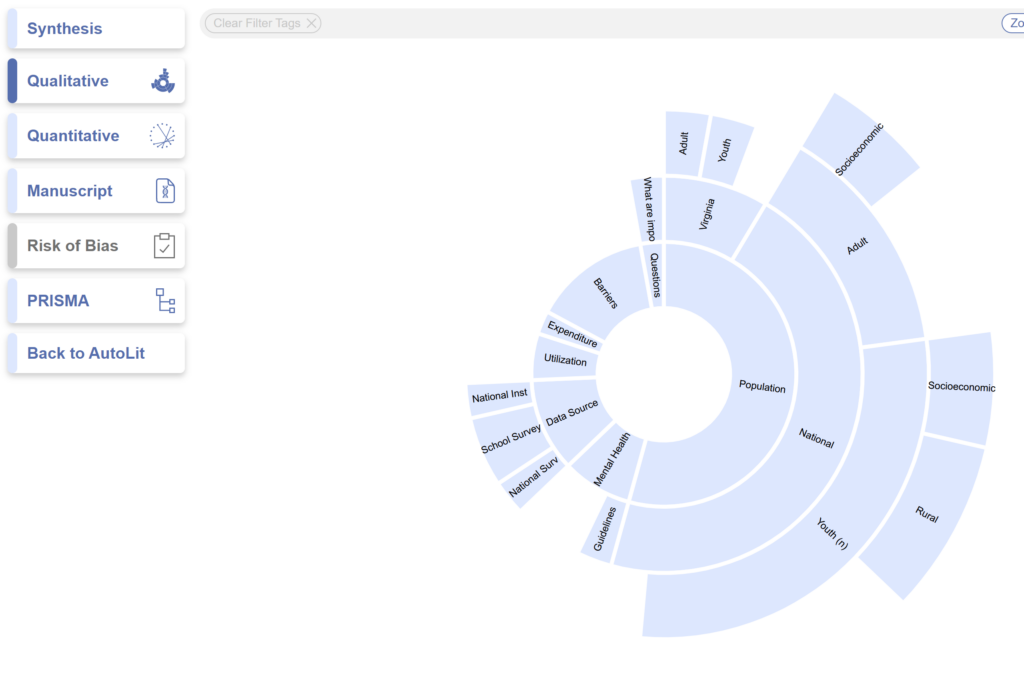
After you’ve gone through the process of AutoLit, all your work can be summarized in the “Synthesis” section. This is where you can see all of your clinical results, in an interactive state. All the work you’ve done in each module is reflected in Synthesis. For example, the number of records returned by your searches, as well as the decisions made in screening, are reflected in the PRISMA diagram and can be filtered by date, shared, or exported. But Synthesis doesn’t stop at PRISMA compliance. Whether you want to see the way all of the studies connect through the tags you’ve applied in the Qualitative and Quantitative Synthesis, this half of the platform is like an informative celebration of all the hard work you put into building your amazing nest. If you’re an academic, check out the Manuscript Editor, complete with Live Tables. If you’re working in the industry, check out the table exports, or the Dashboard, which enables you to create curated insights for both internal and external stakeholders.
While Nested Knowledge has a host of options to support a variety of academic and industry-standard workflows, not all modules are necessarily required in order to do great research. If, per your research question and protocol, all you need is the ability to screen studies and apply a few tags, no problem: simply turn off MA Extraction and Critical Appraisal and you’re golden. While it can feel like a daunting process, taking your time and planning your nest carefully will go a long way.
There are a ton of advanced features we haven’t covered: dual and two-pass screening, MA Extraction, Critical Appraisal as well as many others. For more info, check out our wiki or reach out to contact@nested-knowledge.com