May 10, 2022
This help article is about building a tagging hierarchy through the NK Platform. If you have a research question already prepared and want to build a different hierarchy, click here to read about tagging in the software*.
NK is a powerful tool for both quantitative and qualitative research. At NK, tagging is the basis of how we qualitatively look at the evidence.
If you are anything like me, you probably took one look at tagging at NK, cocked your head, wrinkled your brow, and whispered, “Huh?” louder than you intended. We’ve all been there before, which is why I decided to write a blog to hopefully provide some insight into tagging. In this blog, we’re going to go through the higher level concepts behind tagging to give you guys more clarity on how, when, and why to use this tool. Enjoy!
Great question! Tagging is our way at NK of associating a key word or concept with a paper. For example, if I see a paper on stroke mentions mechanical thrombectomy (MT), I might want to label that paper, and any others that mention of MT, with the key word “mechanical thrombectomy (MT).” This then allows you to filter through the studies to find the ones labeled with the keyword you applied.
Think of it like this: if you had a stack of studies on your desk and you put a sticky note on each one that mentioned mechanical thrombectomy, you’d then be able to sort that big pile into two smaller piles: one pile that had the sticky note (and therefore mentioned MT) and one pile that didn’t. The act of tagging is equivalent to putting a sticky note on a study. The act of sorting the studies is equivalent to filtering in study inspector or qualitative synthesis in the software (future blog on these forthcoming!).
Now this all sounds fine and dandy in a simple case with one tag, but how do we expand this approach when you have a bunch of tags? I’m happy to say that it works the same way. You can create as many tags as you like and apply as many as you deem appropriate to each study. However, I’m sure you can see how that could get chaotic if the created tags were all completely unstructured! To address this, you can hierarchically structure tags in the software. Let’s dive a little deeper into what this means.
In the example I gave above, we only had one tag, so we really didn’t need to think about how to organize our tags. However, most researchers are going to want to apply many tags, perhaps more than 20! The question then becomes, “How do we organize those tags?” because, realistically, you’re going to have a hard time keeping track of 20+ things unless there’s some structure.
At NK, we structure tags hierarchically. Meaning, we like to organize our tags into concept maps so that anyone looking at a nest can easily figure out how different concepts are related to each other. We call these concept maps tagging hierarchies.
And this is where the magical part comes in: once these tags are applied to the studies in your review, those tags automatically form an interactive visual sunburst in Qualitative Synthesis. See the embedded example.
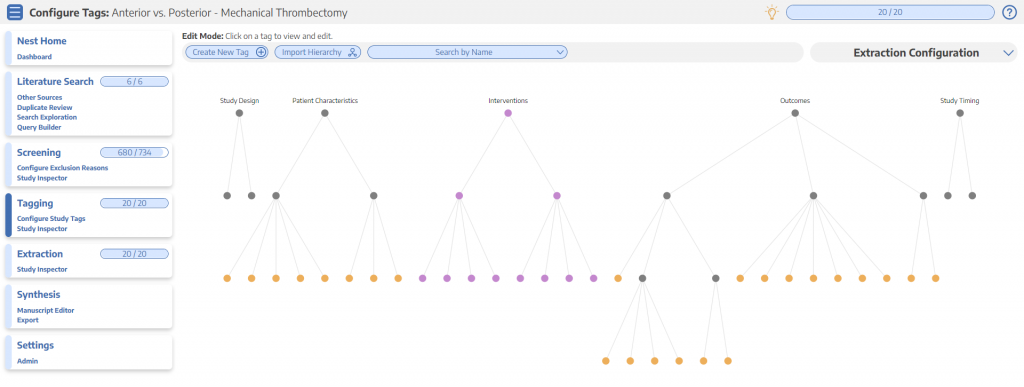
A good example of a tagging hierarchy is from our recently published paper “Mechanical thrombectomy in anterior vs. posterior circulation stroke: A systematic review and meta-analysis.” If you click where it says “Dendrogram” in the panel to the right, you’ll have an interactive version of the static image above.
The nodes on the first level of the hierarchy, (“Study Design”, “Patient Characteristics,” etc) are called root nodes. The root nodes have child nodes that are on the second level. Examples of these child nodes are “Randomized Controlled Trial” and “Timing.” These nodes also have child nodes that compose the third level. Just like there’s a child node concept, there is also the parent node concept. For example, “Timing” is a parent node to the child tag “Onset-to-needle,” while the parent node of “Timing” is “Patient Characteristics,” which also happens to be a root node.
The concept of parent/child node is fundamental to how these hierarchies are organized. In general, the parent node is a more general concept that the child nodes fits underneath. For example, “Study Design” has two child nodes: “Randomized Controlled Trial” and “Prospective Single-Arm MT Study.” Both of those nodes are types of study designs, which is why they were put underneath that node.
The same type of thinking is used to construct the rest of the hierarchy. For example, there are two types of patient characteristics of interest in this nest: “Timing” and “Demographics.” There are more specific timing variables of interest such as “Onset-to-needle” and “onset-to-puncture” that are nested underneath “Timing.” The same goes for “Demographics,” which has variables like age and sex nested underneath it.

There are two ways to interpret this question:
For the first question, I’d check out our wiki pages on tagging. It’s pretty easy to throw some nodes on the screen. Some nice features that I want to point out are:
However, the second question is much more complex! It’s hard to know what you “should” tag. That being said, I try and keep my hierarchies small and focused. You should only have things in your hierarchy that are relevant to your review and present in the literature. Additionally, I recommend clearly structuring your hierarchy such that a random person could understand how different concepts are related to one another. For example, you could know absolutely nothing about stroke but surmise that mRS 0-2 is a clinical outcome of stroke. The principle of parsimony is key in building a good hierarchy!
The last piece of advice I want to be sure to impart is to completely build your hierarchy before you start applying tags to studies. When doing a systematic review, you need to make sure your procedure is systematic (duh!). It’ll be hard to systematically tag if you add tags to the hierarchy half way through reviewing the studies (what if a study you already finished tagging should have been tagged with a tag you recently added?)
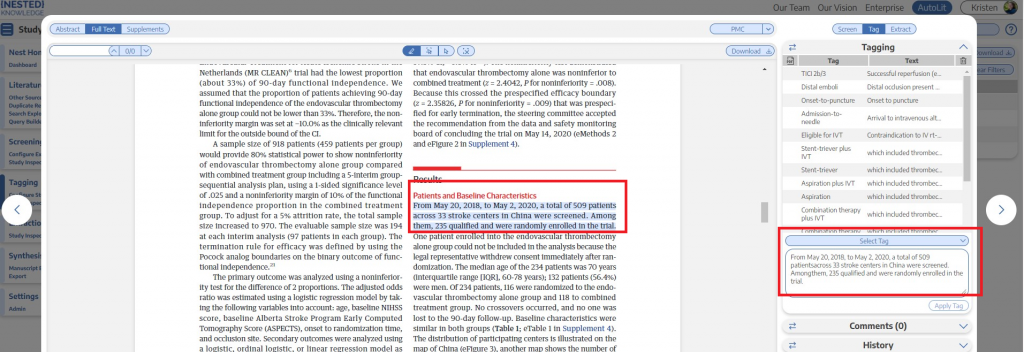
Firstly, congratulations on building your hierarchy. It’s definitely not an easy task to build a focused and well organized hierarchy, and that deserves some acknowledgement! After you’ve built your hierarchy, you can begin applying the tags you created to individual studies! For some further instruction on this, check out this page in the wiki.
After many long, hard hours, you’ve finally finished tagging. Now, what do you do with the information you’ve collected? Here are some options:
Email us: support@nested-knowledge.com or click the button below. We’d love to hear from you.